

Support
Your support questions, answered faster!
Use our no-installation, interactive, support web app to complete step-by-step troubleshooting and perform hardware tests to ensure your robots are working properly!
How Can We Help You?
Featured FAQs
Featured
Many of our Hummingbird components are uniquely compatible with the Hummingbird controller while others are not.
Our sensors are uniquely engineered to produce meaningful data (common units of measure) in each of the programming environments, and we know that the voltage requirements are compatible. Basically, we have done the breadboarding for you with our sensors, so you don’t need to add a resistor or anything like that. You can use other sensors, but they must be analog sensors that take a 3V supply. You would need to look through the datasheet for any additional circuitry requirements, so using third-party sensors is a little tricky.
Other parts like the LEDs and servos have not been altered and are more commonly available. Third-party LEDs and servos should work just like our components when you use them with the Hummingbird controller. Servos should draw less than 500 mA of current in free-running mode.
Due to a variation in voltage, AA rechargeable batteries may not turn on the green status light on your Hummingbird Bit controller. You may also note that the battery indicator icon in BirdBlox, Snap!, and BlueBird Connector may show a low battery status, which is due to the variation of voltage in rechargeable batteries.
Instead of AA batteries, we recommend our rechargeable power banks! With these power banks, you can expect to run a Hummingbird Robot with two active motors for 6+ hours. The power bank also includes an LED indicator light, letting you know the charging status.
If you have any questions about our rechargeable power banks, please email support@birdbraintechnologies.com
Finch Robot FAQs
Finch Robot 2 Loan Program
The most important criteria for being selected for the loan program is to have a strong plan for what you will do with the Finches. Additionally, successful organizations used the Finches often and reached many students. You can improve your chances of being selected by reading through and understanding the information included on our loan program page. Program requirements and criteria are located near the bottom of the page.
The loan program is only available for organizations in the contiguous United States. Shipping costs and customs requirements make it cost-prohibitive to loan robots outside of the US at this time.
Yes! We are so happy that you enjoyed the program so much that you want to do it again! We particularly like giving loans to schools who loved the Finches so much that they’ve tried to establish a permanent flock, no matter how small. We’ve had a lot of schools have luck with getting grants for a small number of Finches and then requesting a loan to supersize their flock for a few months of intense robotics! If you’ve acquired some Finches since your loan, do let us know!
Yes! We’d love to give you a chance to super-size your Finch program for a few months. The Finch and the loan program are all about increasing access to computer science, so please use the loan program as an opportunity to recruit more kids into your CS classes, share your students’ knowledge with younger students, or to hold community-wide events!
We envision the Finch robots being used only in library or school settings, and we would strongly prefer that they not be checked out individually. Some programs have had negative experiences loaning out robots and not getting them returned. If you cannot return the Finches within the required time frame, you will need to purchase them.
Yes! We are happy to support all organizations that are teaching kids to code. We are especially interested in summer programs since the robots do not like being idle all summer, waiting for school to start! The main criteria to consider is that your organization has a non-profit mission. We prefer that you provide free programs for students. You may charge fees for programs involving the Finch, but only to cover your costs, not for profit.
We are happy to receive applications that combine users across nearby schools or libraries, regardless of whether they are in the same district. Our main requirement is that we can ship to and from a single address. You should consider building time in to distribute and then collect the robots from participating organizations.
There are a myriad of activities you can do with the Finches and we have many ready-to-go lessons and inspiration ideas located on the Finch Activities page on our website (just choose your coding preference to begin!) With sensors, buzzers, LEDs, and even a pen mount for drawing, the options are limitless!
On our portal select the Finch and the software language you will use and you will see activity ideas for each programming language.
Self-paced video courses are also available for you to learn how to program and teach with the Finch.
The Finch Robot 2.0 works with any laptop, as well as most iPads, Android, and Fire tablets. Tablets must have Bluetooth 4.0 or above to work with the Finch Robot (most tablets made after 2015 meet this requirement).
Yes! Birdbrain Technologies will cover all shipping costs for the loan program. We’ll also replace any robots that break due to normal wear-and-tear during the loan program. The Finch is a robust robot, but we understand that students can get very exuberant when working with the Finches.
Your organization will have to spend time training your staff on how to use the Finches and exploring which activities best suit the needs of your learners. We also require that you share your results with us to benefit future organizations within the loan program and to spread the joy of computer science!
Our standard loan is for 2 months – that’s generally 6 weeks of classroom time plus travel time. We do make exceptions for organizations that are planning on using the robots across multiple classrooms, teachers, or schools, and thus require more time with the Finches.
We request that you use the Finches in pair programming, one Finch robot for every 2 students. Additionally, for every robot borrowed, we would like you to reach at least 5 students total. For example, if you have 3 classes of 20 students per class, you should request 10 Finches to reach your 60 total students.
BirdBrain Technologies’ Finch Robot loan program loans out the Finch Robot 2.0 to districts, schools, libraries, and other organizations across the United States. This free program is our effort to reach students who may not otherwise get the chance to program a robot during their normal school day. In the last 11 years we have reached over 275,000 students with our free robot loans!
We generally loan Finch Robots to an organization for 2 months. We expect the students to work using pair programming, so 2 students work together with each Finch Robot.
Visit the loan program website or subscribe to our newsletter to learn when our next application cycle will begin.
Still have questions? Please email us at loanprogram@birdbraintechnologies.com.
Fixing Your Finch
If you need help repairing Finch 2.0’s wheel, rubber marker grommet, or battery, please check out the pages below.
- How do I repair Finch 2.0’s wheel?
- How do I replace Finch 2.0’s rubber marker grommet?
- How do I fix Finch 2.0’s battery?
In other, rare cases, you may need to replace Finch 2.0’s other components. The videos below will guide you in replacing or repairing these components. Please reach out to support@birdbraintechnologies.com for help procuring any parts you may need to fix your Finch issue.
Taking Apart Your Finch 2.0
Replacing the Distance Sensor
Replacing the Top Shell or Tail LEDs (neopixel strip)
Checking the micro:bit Holder and Cable
Repairing the Power Button
Reassembling Finch
If your Finch 2.0 is not turning on, this could indicate one of the following causes:
- The battery is not seated properly in the holder. To correct this, please open the battery door and push the battery into the holder with enough force to depress the springs in the Finch. You can see this procedure in the video below.
- The battery is no longer holding a charge. You can test this by switching batteries with a working Finch using the same video below. If swapping the battery works, then you will need a replacement battery. If your Finch in still under warranty, please send an email to support@birdbraintechnologies.com so we can assist you in procuring a replacement! If your Finch is out of warranty, you can purchase a replacement battery.
You may need to remove the star-shaped marker grommet because it is torn or not centered in the hole. It turns out that the rubber grommet is not needed to hold Crayola Paint Brush Pens so it can be removed without any problem. The videos below will show you how to open your Finch, remove or replace the rubber grommet, and put the Finch back together.
Taking Apart Your Finch 2.0
Replacing the Rubber Grommet
Reassembling Finch
Before we repair the Finch’s wheel, we first need to check the cause. Pick up your Finch and turn it upside down. If the star-shaped marker grommet is torn or not centered in the hole, pull it out with pliers and see if that fixes the movement issue. If that does not solve the problem, then we can check the wheels themselves. If you spin the wheels and one of them makes a grinding sound or spins freely, then you will need to contact us for a wheel repair kit. Otherwise, please try our calibration solution.
Once you have a Finch Wheel Repair Kit from us, please follow the videos below to open your Finch, repair the wheel, and reassemble Finch.
Some items to note before starting:
- If the small screwdriver isn’t removing the screws in a gearbox, please try another one from a different kit.
- After snapping the gray plastic housing back onto the motor, make sure that the screw hole and the hole in the board are lined up correctly.
- The gray plastic housing around the motor will take a lot of force to snap back into place. This is ok!
- When working with the gearbox and the gray plastic housing, please be mindful of the light sensors on the other side.
- If the gray plastic housing won’t snap back on, you can cut the tabs off the housing with diagonal cutters, and then screw the housing back on.
Taking Apart Your Finch 2.0
Repairing the Wheel
Please note which USB port you have on your Finch by looking at the charging port on the tail to determine which video below is appropriate for your robot.

For microUSB Finches:
For USB-C Finches:
Reassembling Finch
General Questions
Yes, if you bought your Finch 1s within the last 30 days and they are in resalable condition. See our return policy for more information.
The Finch 2 battery lasts for 7+ hours if all the motors and LEDs are on at full power; we estimate that it will last 12-20 hours under normal operation.
The Finch 2 battery takes 7 hours to charge completely; we suggest charging it overnight, and the charge should last the whole school day.
The Finch 2 battery takes 7 hours to charge completely; we suggest charging it overnight, and the charge should last the whole school day.
The Finch 2 battery lasts for 7+ hours if all the motors and LEDs are on at full power; we estimate that it will last 12-20 hours under normal operation.
Our products support block-based coding languages including BirdBlox, Snap!, and MakeCode. Snap!, a programming language very similar to Scratch, that was created by UC Berkeley, is used in the Beauty and Joy of Computing curriculum, which is an AP CS Principles curriculum used country-wide. You can learn more about Snap! here and more about using the our products with Snap! here.
Yes, the Finch Robot 2 is compatible with micro:bit V2.

The Finch Robot 2 is designed to work with many sizes and types of writing tools. You should adjust the writing tool so that both of your Finch’s wheels touch the ground and the writing tool drags lightly on your drawing surface. We highly recommend these markers.
Tech Support
Seeing Hummingbird Blocks when you have paired a Finch Robot using bluetooth is an indication that the micro:bit is not properly connected to the Finch; therefore, the micro:bit assumes it’s paired to a Hummingbird Controller. This can happen when the micro:bit is not fully inserted into the Finch tail or is slightly dislodged when set in place.
There are two places you can check to see if this is happening once you pair your robot:
- When you look at the top bar, after pairing the robot, you should see a Finch icon on the left side. If you see a Hummingbird controller icon, the micro:bit is not recognizing the Finch.

- When you look at your micro:bit, you should see ten characters flashing. After the first three letters, you should see #FN – this indicates a successful connection to the Finch. If you see #BB or #MB, the micro:bit is not recognizing the Finch. Double check to make sure your micro:bit is inserted correctly.

You can fix this by turning the Finch off, removing and reinserting the micro:bit, and then turning the Finch back on. The page should automatically disconnect when you turn the Finch off; however, you may need to refresh the webpage or open it in a new tab before pairing the Finch again.
When your micro:bit is plugged into your computer via USB cable, two things should happen:
- The little yellow light on the bottom of the micro:bit should come on. This means the micro:bit is receiving power.
- The micro:bit should show up as a drive in your file explorer (Windows/Chromebook) or on your desktop (Mac). If the drive is showing up as “maintenance,” see our article titled, “Why is my micro:bit is in ‘maintenance mode?’“
If neither of these are happening, then there is a connection problem. The issue can often be solved by switching USB ports in the computer, or by switching out the USB cable. If that does not work, try a second micro:bit (if available) and see if that one connects.
If you are still unable to get power or see the micro:bit as a drive, then contact us at support@birdbraintechnologies.com and use the subject line “My micro:bit is not connecting to my computer.”
There are a few reasons why you may have to update your micro:bit firmware, but the most common reason is that the .hex file will not download to the micro:bit. Typically, when a .hex file is downloading, the yellow light on the back of the micro:bit will blink. If the yellow light does not blink during the download process, there is a good chance your firmware is out of date.
Follow these instructions from microbit.org to update your micro:bit firmware: https://microbit.org/guide/firmware/
A “.hex” file is the only file type that a micro:bit will read. Whether you are downloading your .hex file directly from an online language like MakeCode, or you are downloading a custom .hex file (like the BitFirmware.hex required for bluetooth connection) from our website, confirming that the .hex file is correctly downloading onto your micro:bit is important.
Note: While micro:bit may appear in your File Explorer (Windows/Chromebooks) or on your Desktop (Mac) as a drive, micro:bits do not behave like drives. When a .hex file is “copied” onto the micro:bit, that file will begin to automatically run as a program. The .hex file will not show up in the micro:bit as it would in a drive.
- Does your micro:bit show up as a drive in your file explorer (Windows/Chromebook) or on your desktop (Mac)? If not, then you will want to see our article titled, “Why is my micro:bit not showing up on my computer?”
- Do you know where your BitFirmware.hex file is being downloaded to? It is possible that the .hex file is downloading, but it is not going somewhere other than the micro:bit. See the video below for more information.
- When you copy or download the BitFimware.hex file onto the micro:bit, is the yellow light on the back of the micro:bit flashing? If not, your micro:bit firmware may need to be updated. Check out our article titled, “How do I update my micro:bit firmware?”
MacOS 13
Are you getting the Error 100093 or “Transfer timed out” message when trying to transfer a hex file to your micro:bit using MacOS 13? You’re not alone. Many users have reported this issue when trying to use the drag-and-drop method to transfer files to their micro:bit. The good news is that the micro:bit team is aware of this bug. You can find information regarding a workaround on micro:bit’s support article.
Chromebook
Is your micro:bit disappearing from Files after connecting via WebUSB direct flashing? This is because Chromebooks only allow one method of access to a device. If you would like your micro:bit to show up in Files, you will need to unpair your micro:bit from WebUSB direct flashing. To download your hex file, instead of pairing your micro:bit, you will need to click the three dots and click “Download as file.”
Normally downloaded files appear in Downloads, however, there is a way to get your program to download directly to your micro:bit. In a Chrome browser, click the three dots in the top right corner. In settings, click “advanced” and turn on “ask where to save each file” in the download section. You can find a video of this process on this webpage. Every student that logins will need to adjust these settings.
You can find more information on micro:bit’s support article.
Yes! To AirDrop a file to a second iOS device, tap the File button in BirdBlox.

Then tap the Share button by the name of the file you wish to share.

Then select the AirDrop icon. Choose the device that should receive the file.

On the device that receives the file, select BirdBlox when asked how to open the file. The file will open in BirdBlox!

Yes! BirdBlox is compatible with a number of apps for saving files in the cloud, including Google Drive and Dropbox. To save a BirdBlox file in the cloud with one of these options, you must have the corresponding app on your tablet. For example, to use Google Drive with BirdBlox, you must first have the Google Drive app installed. We will demonstrate how to export a file to Google Drive, but the process is similar for Dropbox.
To save a file to Google Drive, tap the File button in BirdBlox.

Then tap the Share button by the name of the file you wish to share.

Then select the Google Drive icon. You have saved the file to Google Drive!

To open a file from Google Drive, navigate to the file in the Google Drive app, then tap the three dots to the right of the file name.

Select Open in.

Then select Copy to BirdBlox (iOS). You may need to scroll to the right to see this option. On Android, the file may open automatically when you select Open in.

Note: In iOS, You can also use the Cloud button in BirdBlox to browse to Google Drive and open a BirdBlox file that is saved in Google Drive.

For step-by-step troubleshooting for your Finch battery, please visit our Interactive Support App!
Check that your USB cable is plugged directly into the Finch 2 charging port as shown below. If the USB cable is plugged into the micro:bit the Finch 2 will not charge. 
If you have plugged in Finch correctly and it’s still not charging, there are two possible reasons it is not charging. One is that the battery is not seated properly in the holder, so it is not turning on. To correct this, please open the battery door and push the battery into the holder with enough force to depress the springs in the Finch. You can see this procedure in this video.
The second possibility is that the battery is no longer holding a charge. We can test this by switching batteries with a working Finch using the same video above. If your battery is no longer holding a charge, please email support@birdbraintechnologies.com to get information on how to get a replacement battery.
It is important to save your work frequently in Snap!. Snap! does not save automatically. This will cover two different ways of saving your work. First, you can export your work and save it to your computer or a USB drive. If you have internet access, you can also save your work online using a Snap! cloud account.
Note: Programs written in Snap! using the BlueBird Connector for Mac/Windows cannot be run on a Chromebook, and vice versa. If you need to convert a saved program from one platform to another, you can use this online converter.
Exporting a Snap! Program
You can save your work by exporting your Snap! File and saving it to your computer, cloud storage, or a USB drive.
Go to File and then Export project.

Depending on your browser settings, the program will either be downloaded directly to your Downloads folder, or you will be asked where you want to save it. If the program is downloaded automatically, it is named FinchSingleDeviceStarterProject.xml. You can find this file in your downloads folder and rename it or move it as needed. You should leave the .xml extension in the file name.
Important Note: You must export a new version of your file every time you want to save it!
Loading a File
To load a project that you previously exported, go to File and then Import. Select the name of your project. Then navigate to your exported file to open it.

Saving to a Snap! Cloud Account
If you have internet access, you can save your work in Snap! by using a cloud account. Click the Cloud button and then Log in to sign in to your account. You may need to set up an account if you do not already have one.

Once you are logged in, choose Save As on the File menu.

Give your program a descriptive name and make sure to select the Cloud option. Then click Save.

Important Note: Make sure to save your work frequently by going to File and then Save!

Loading from a Snap! Cloud Account
To open a file you saved previously, first log in to your Snap! cloud account. Then go to File and then Open.

Select your file in the window that pops up. Be sure to select the Cloud option.

MakeCode automatically saves programs on the device that you are using. However, these programs may be deleted if your browser history is deleted. This will describe ways to save a program more permanently or share it with another person.
Downloading a File
Instead of downloading a program’s .hex file to the Finch, you can download it to your computer or Chromebook. After clicking Download, select the location where you want to save the .hex file and click Save. You can then email the file, store it on a USB drive, or treat it as you would any other file.

Loading a File
To load a file that you have saved in a .hex file, click on the Home button in MakeCode. From the home screen, click on the Import button.

Click on Import File.

Click on Choose File and navigate to the file you saved. Select it and then click Go ahead! Your file will open in MakeCode.

Sharing a File
To share a file, click on the Share button in MakeCode

Click Publish Project.

MakeCode will show you a link that you can share with others. Alternatively, you can also click Embed to see code to embed your project in a website.

This is a known bug in snap.birdbraintechnologies.com and we have two ways to work around this issue.
- You can disconnect your Finch, refresh the webpage, and reconnect your Finch to get the Finch blocks to return.
- You can import our blank Finch program to reload your Finch blocks. You can find this XML file below.
No, it is not possible to use Bluetooth to download your MakeCode program to your Finch 2.0 robot. While it is possible to send hex files to a micro:bit using Bluetooth, the MakeCode Bluetooth capability does not work reliably with our products. Instead, you will need to use the USB cable to send hex files to your Finch.
If you are interested in using Bluetooth, we encourage you to check out our tutorials for FinchBlox, BirdBlox, Snap!, Python, or Java.
There is a way to fix that! Use the steps below and follow along with our video.
- Load the attached hex file onto a V2 micro:bit
- Plug it into your Finch and then turn on your Finch
- You’ll see the micro:bit screen display ‘P’, the rows will fill up, and then you’ll see a check mark. After that Finch turns off.
- Now either replace the micro:bit or change the code on the micro:bit to a different program to test it.
If the above doesn’t work or you have a V1 micro:bit, please reach out to us at support@birdbraintechnologies.com for additional assistance!
The BlueBird Connector requires that your computer be able to use Bluetooth 4.0 to connect to the Finch Robot or the Hummingbird Bit. There area few reasons that you may see this message:
- You will see this message if your device does not have Bluetooth capability. If you are using Windows and your device does not have built-in Bluetooth, you can use a Bluetooth dongle to add this capability. For more information, see Do your products require a device with Bluetooth capability?
- You will see this message if the built-in Bluetooth on your device is not turned on. Check to be sure that Bluetooth is enabled.
- You are running an old version of the BlueBird Connector. If you are using Windows and installed the BlueBird Connector before September 15, 2021, you need to install a newer version in order to use your device’s built-in Bluetooth.
The following steps assume that you have properly followed the Snap! set up procedure, and you have downloaded the BitFirmware.hex file onto your micro:bit. If you experienced any issues downloading the hex file, see our article titled, ”Why is my MakeCode program/.hex file not showing up on my micro:bit?”
- Are you getting a “Connection Failure” message? See our article titled “Why am I getting ‘Connection Failure’ message in the BlueBird Connector?”
- Prior to any connection attempt, check to see if the micro:bit flashing 10 characters. If it is not, that may mean that the BitFirmware.hex file was not properly downloaded onto your micro:bit. If you are having trouble downloading the provided BitFirmware.hex file, see our article titled, “Why is my BitFirmware.hex file not showing up on my micro:bit?”
- Make sure you are running the most recent version of the BlueBird Connector. You can find the most up-to-date applications here for Mac or Windows.
- Do other devices with the BitFirmware.hex file appear in the BlueBird Connector? If so, AND you can confirm that the micro:bit is flashing 10 characters, the issue is a faulty bluetooth emitter in the micro:bit and it will need to be replaced. Your Hummingbird Bit is likely functioning just fine. If you have another micro:bit, switch it out and see if the BlueBird Connector detects it.
- If you continue to have issues getting your micro:bit to appear as a device in the “Connect Device” menu in Snap!, please contact us at support@birdbraintechnologies.com with the subject heading “My Hummingbird Bit is not showing up as a device in Snap!.”
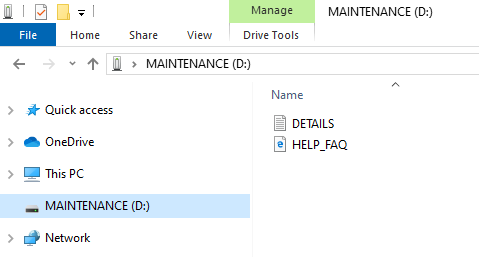
If your micro:bit is showing up as “MAINTENANCE” in your File Explorer window, rather than “MICROBIT,” then your micro:bit is in maintenance mode. This can happen when the reset button on the micro:bit is pressed while plugging in to your computer’s USB port (see image below).
In order to leave maintenance mode and be able to download your code follow these two easy steps:
Step 1:
Unplug the micro:bit from the USB cable, making sure the reset button is not pressed, and plug the micro:bit back in. The board should now show up as a drive titled “MICROBIT,” indicating it is back in normal operating mode.
Step 2:
If Step 1 wasn’t successful, you’ll need to download new firmware onto the micro:bit. Plug in your troubled micro:bit and click the purple “Download the latest micro:bit firmware” button about halfway down this webpage.
General Questions FAQs
Curriculum
Many of our projects are aligned to Common Core State Standards, Next Generation Science Standards, and ISTE Standards. View our standards page to see how projects for both the Finch Robot and the Hummingbird Robotics Kit align.
You can register as an educator, which gives you access to sample code and other resources on our website, by filling out this form.
Privacy Policies
Your privacy is critically important to us. At BirdBrain Technologies, we have a few fundamental principles:
- We don’t ask you for personally identifiable information unless we truly need it.
- We don’t share your personally identifiable information with anyone except to comply with the law, or protect our rights.
- We don’t store personally identifiable information on our servers unless required for the on-going operation of one of our services.
If you have questions about deleting or correcting your personal data please contact support@birdbraintechnologies.com.
This Privacy Policy applies to birdbrain.kinsta.cloud/ (“the Site”) and our subdomains such as snap.birdbraintechnologies.com, etc, and governs our data collection, processing and usage practices. Our ecommerce store, at subdomain store.birdbraintechnologies.com, requires more data (such as billing/shipping addresses) and therefore is governed by a different privacy policy, accessible here. If you do not agree with the data practices described in this Privacy Policy, you should not use these services.
INFORMATION WE COLLECT
When you visit the Site, we automatically collect certain information about your device, including information about your web browser and some of the cookies that are installed on your device. We refer to this automatically-collected information as “Device Information”.
We collect Device Information using the following technologies:
– “Cookies” are data files that are placed on your device or computer and often include an anonymous unique identifier. We limit our usage of cookies to those strictly necessary for the correct functioning of the site. For more information about cookies, and how to disable cookies, visit: http://www.allaboutcookies.org.
– “Log files” track actions occurring on the Site, and collect data including your browser type, referring pages, and date/time stamps.
We also use Google Analytics to track the information and behavior of our website users. Google analytics is enabled through the use of cookies.
HOW DO WE USE YOUR INFORMATION?
We use the Device Information to improve the functioning of the site by checking that you are using a compatible browser or by generating analytics about how our customers browse and interact with the Site to understand how to improve navigability and usability.
SHARING YOUR PERSONAL INFORMATION
We may share Personal Information obtained via correspondence or through interacting with our webstore to comply with applicable laws and regulations, to respond to a subpoena, search warrant, or other lawful request for information we receive, or to otherwise protect our rights.
YOUR RIGHTS
You have the right to access personal information we hold about you and to ask that your personal information be corrected, updated, or deleted. If you would like to exercise this right, please contact us through the contact information below.
Additionally, if you are a European resident we are processing your information in order to fulfill contracts we might have with you (for example if you make an order through the Site), or otherwise to pursue our legitimate business interests listed above. Additionally, please note that your information will be transferred outside of Europe, including to the United States and Canada.
DATA RETENTION
When you place an order through the store, we will maintain your Order Information for our records unless and until you ask us to delete this information.
GATHERING INFORMATION FROM OR COMMUNICATING WITH CHILDREN
Pursuant to COPPA guidelines, BirdBrain Technologies does not knowingly collect personally identifiable information online from children under the age of 13. If a parent or guardian is made aware that a child under the age of 13 has provided us with personally identifiable information without their consent, we encourage you to please contact us at +1 888-371-6161, by email at support@birdbraintechnologies.com, or at the address listed at the bottom of this policy, and we will remove the information about the individual from our database.
LINKS TO THIRD PARTY SITES FROM BIRDBRAINTECHNOLOGIES.COM
You may find links to other sites on the BirdBrain Technologies website. When you click on such a link (with a domain name different than birdbraintechnologies.com), you are leaving our site and accessing another party’s website. We do not exhibit control nor do we take responsibility for data collected and used by the external third party site. Please read the privacy policy of those sites to gain better understanding of their practices and policies pertaining to collection, use and distribution of personal data.
CHANGES
We may update this privacy policy from time to time in order to reflect, for example, changes to our practices or for other operational, legal, or regulatory reasons.
DATA SECURITY
BirdBrain Technologies takes precautions within commercially reasonable efforts to protect against the loss or theft of personal information collected from you. This protection applies to information collected in both electronic as well as hard copy form. All personal information is stored in electronic form on our secure servers that we have used commercially reasonable means of security and encryption to protect from unauthorized access or intrusion. While we continuously improve our security using commercially available solutions, it should be recognized that 100% security is not possible.
If you have any questions related to our privacy policy, or to communicate concerns that BirdBrain Technologies may have failed to adhere to in this Privacy Policy, please contact customer support at +1 888.371.6161, email at support@birdbraintechnologies.com, or write to us at the following address:
BirdBrain Technologies
[Attn: Privacy Compliance Officer]
2709 Mondovi Road, Eau Claire, WI 54701
Your privacy is critically important to us. At BirdBrain Technologies, we have a few fundamental principles:
- All BirdBrain software is designed to be safe to use for children under the age of 13.
- Apps only request permission to access data that the app needs to function.
- Your personal information is never transmitted to BirdBrain Technologies.
The privacy policies for specific apps are as follows:
- BlueBird Connector: This app requires permission to use Bluetooth.
- FinchBlox: This app requires permission to use Bluetooth, which requires location permission on Android.
- BirdBlox: This app requires permission to use Bluetooth, which requires location permission on Android. The location is also used for the latitude and longitude blocks. Microphone permission is required for recording sounds. Permission for motion sensors is required for blocks that enable you to control your robot using the motion of the tablet.
- Hummingbird Firmware Burner
- Cube 3 App Privacy Policy: This app requires permission to use Bluetooth, which requires location permission on Android.
- Cube 6 App Privacy Policy: This app requires permission to use Bluetooth, which requires location permission on Android.
- GlowGrid App Privacy Policy: This app requires permission to use Bluetooth, which requires location permission on Android.
- Fractions App Privacy Policy: This app requires permission to use Bluetooth, which requires location permission on Android.
- GlowPix App Privacy Policy: This app requires permission to use Bluetooth, which requires location permission on Android.
Products
Yes, our products comply with Section 889 of the John McCain Telecommunications Act and are free from the following:
- Telecommunications equipment produced by Huawei Technologies Company or ZTE Corporation (or any subsidiary or affiliate of such entities);
- For the purpose of public safety, security of Government facilities, physical security surveillance of critical infrastructure, and other national security purposes, video surveillance and telecommunications equipment produced by Hytera Communications Corporation, Hangzhou Hikvision Digital Technology Company, or Dahua Technology Company (or any subsidiary or affiliate of such entities);
- Telecommunications or video surveillance services provided by such entities or using such equipment.
- Telecommunications or video surveillance equipment or services produced or provided by an entity that the Secretary of Defense, in consultation with the Director of National Intelligence or the Director of the Federal Bureau of Investigation, reasonably believes to be an entity owned or controlled by, or otherwise connected to, the government of a covered foreign country.
The Finch Robot 1 & 2 and the Hummingbird Duo & Bit Robotics Kits have some open source software libraries and APIs available for developers to use.
Check out our Github repository for more information: https://github.com/BirdBrainTechnologies/
The three documents attached are available for shipping carriers that require documentation for the transportation of our product containing a lithium battery.
We expect our products to last 5-10 years with ordinary use.
Some Hummingbird Robotics Kit components (e.g. LEDs) may become integrated into student projects in ways that make these difficult to remove. You can purchase our kit components a la carte to solve this problem!
You should consider budgeting for replacement parts if you are submitting a multi-year grant.
Adult supervision is strongly recommended for children ages 13 and under who are using any of our products.
With supervision, kids as young as 9 successfully program and build with the Hummingbird Robotics Kit. Care should be taken to correctly connect components to the Hummingbird controller, as it is possible to damage the electronics if they’re incorrectly connected.
The Finch Robot can be programmed by kids as young as 5 years old using our icon-based programming languages (no reading required!), all the way up to adults using industry-standard programming languages like Python and Java.
Our products are designed to be low floor, no ceiling: young students can work with them, but students of any age or experience level will find engaging, educational ways to use them as well.
The Finch Robot 2.0 and the Hummingbird Bit will work wirelessly with tablets, Chromebooks, Windows, and Mac machines.
The Hummingbird Duo can be upgraded to run a program wirelessly using tablets with the purchase of the Bluetooth Upgrade Bundle. After switching to Bluetooth, you will be able to program in our free BirdBlox app on your phone or tablet.
The Hummingbird Duo can also can be programmed to run untethered using Arduino and Ardublock.
The original Hummingbird board sold before 2015 does not work wirelessly and must be plugged into a computer or Raspberry Pi while running a program.
The Finch Robot 1 does not work wirelessly and must be plugged into a computer or Raspberry Pi to operate. The Finch does come with a long USB cord, which allows for a range of movement.
In order to work with the Hummingbird Bit Robotics Kit or Finch Robot 2.0 tablets must use Bluetooth 4.0 or higher. The Bluetooth specs are usually listed in the detailed tech specs of the tablet. If the tablet uses Bluetooth 2 or 2.1, it will not work. Tablets from 2015 or newer nearly all use Bluetooth 4.0 or higher, and some from 2014/2013 (such as iPad 3) also have Bluetooth 4.0 or higher.
The Hummingbird Robotics Kit is compatible with iOS (iPad 3 or later), Android, and Kindle devices.
For the Duo Kit only you must purchase a Bluetooth Upgrade Bundle in order to use the Duo with tablets or phones. You can find more information about using the Birdblox app here.
The Finch Robot 1 cannot be used with tablets and phones.
The Finch Robot 2 is compatible with iOS (iPad 3 or later), Android, and Kindle devices.
Owlet apps work on iOS, Android, and Kindle.
The Hummingbird Duo works with Chromebooks using the programming languages MakeCode, Snap!, and Python.
The Hummingbird Bit works with Chromebooks using the programming languages MakeCode, Snap!, and Python
The Finch Robot 1 works with Chromebooks using the Snap! and Python programming languages.
The Finch Robot 2 works with Chromebooks using the programming languages MakeCode, Snap!, and Python.
All Owlet apps work with Chromebooks.
We support a wide variety of devices and operating systems, but support varies based on product. To view a table of software environments by product, visit our software guidance chart.
Please click here to download a PDF of our warranty.
Hummingbird Duo and Bit
- Gather the appropriate cleaning supplies, e.g. CDC/EPA approved disinfecting wipes, disinfecting spray and paper towels, disposable gloves.
- While wearing gloves unplug all components from the Hummingbird board
- Wipe down the outside of the Hummingbird storage container, board, and any components that were used with disinfecting wipes. If you are using disinfecting spray, do not spray directly on to the Hummingbird board or components, spray on to a paper towel and use that to wipe the surface (spraying directly on to the Hummingbird board could damage the electronic components). Be careful not to let liquid get into the power ports, component ports, or micro:bit slot.
- Be sure to follow the instructions on your disinfectant, many need to stay wet for 3-5 minutes to take full effect.
- Allow the Hummingbird and components to dry completely before plugging back in or turning the power back on.
- Make sure to wash your hands for a minimum of 30 seconds before and after using or cleaning your Hummingbird. Be sure to also clean and disinfect the device you are using to program your Hummingbird, as well as any craft tools or supplies you may have used.
Finch and Finch 2.0
- Gather the appropriate cleaning supplies, e.g. CDC/EPA approved disinfecting wipes, disinfecting spray and paper towels, disposable gloves.
- While wearing gloves, unplug the Finch from it’s charger/cord.
- Wipe down the surface of the Finch and cord with disinfecting wipes. If you are using disinfecting spray, do not spray directly on to the Finch, spray on to a paper towel and use that to wipe the surface (spraying directly on to the Finch could damage the electronic components). Make sure to wipe around the tires, marker holder, and anywhere where hands may have touched. Be careful not to let liquid get into the charging ports, micro:bit slot, or USB port.
- Be sure to follow the instructions on your disinfectant, many need to stay wet for 3-5 minutes to take full effect.
- Allow the Finch to dry completely before plugging back in or turning the power back on.
- Make sure to wash your hands for a minimum of 30 seconds before and after using or cleaning your Finch. Be sure to also clean and disinfect the device you are using to program your Finch.
The block-based programming languages BirdBlox, Snap!, and MakeCode include block translations for a number of additional languages.
Languages available are: Arabic, Catalan (not available in MakeCode), Chinese (Simplified and Traditional), Danish, Dutch, Finnish, French, German, Hebrew, Korean, Portuguese, Spanish, and Swedish.
If you don’t see a language you want, but would be willing to help us translate, please contact amanda@birdbraintechnologies.com.
Here is how to find the translated blocks in each programming language:
BirdBlox
To select a different language in BirdBlox, click the Settings button and then the Language icon. Then select the language that you want.
Snap!
To select a different language in Snap!, click the Settings button and then select Language.
In the pop-up window, select the language that you want. If the language is listed in the pop-up, but not on our list of translated languages above, that means that Snap! supports this language, but we do not yet have a translation available for our robot blocks.
MakeCode
To select a different language in MakeCode, click the Settings button and then select Language.
In the pop-up window, select the language that you want. If the language is listed in the pop-up, but not on our list of translated languages above, that means that MakeCode supports this language, but we do not yet have a translation available for our robot blocks.
Our products support block-based coding languages including BirdBlox, Snap!, and MakeCode. Snap!, a programming language very similar to Scratch, that was created by UC Berkeley, is used in the Beauty and Joy of Computing curriculum, which is an AP CS Principles curriculum used country-wide. You can learn more about Snap! here and more about using the our products with Snap! here.
Scratch 2 offline (or ScratchX for Chromebooks) was supported for Hummingbird Duo and Finch 1, but because older versions of Scratch are no longer maintained by the Scratch team, we no longer support these as of July 31, 2021. Legacy materials are available here but are no longer being updated. We encourage you to use Snap! with your Finch 1 Robot and Hummingbird Duo Kit to ensure long-term support.
The easiest way to determine if you have a micro:bit V1 or micro:bit V2 is to check the micro:bit logo on the front of the board. If the logo is the same color as the triangles on the top left corner, you have a micro:bit V1. If the logo is metallic gold, you have a micro:bit V2.
Alternatively, if your micro:bit is not plugged into your Finch Robot or Hummingbird Robotics Kit, you can also find a version number on the lower right hand corner on the back of the micro:bit.
This chart summarizes the differences between the versions of the micro:bit. All versions will work with BirdBrain Technologies’ products.

The original Finch Robot 1.0 and the Hummingbird Duo Robotics Kit do not require a device with Bluetooth capability.
The Hummingbird Bit Robotics Kit and the Finch Robot 2.0 can be programmed in MakeCode without Bluetooth. All other programming languages (FinchBlox, BirdBlox, Snap!, Python, and Java) require a device with Bluetooth capability.
How do I know if my device has built-in Bluetooth?
- Virtually all phones and tablets have Bluetooth.
- All Chromebooks that support Google Play have Bluetooth. This includes all Chromebooks made since 2019 and most Chromebooks manufactured prior to that.
- All Macs made since 2014 and most Macs made since 2012 have Bluetooth.
- Most Windows laptops have Bluetooth, but not all desktops do. To check whether your Windows computer has Bluetooth, open the Device Manager and look for a Bluetooth entry. Expand this entry and look for “Microsoft Bluetooth LE Enumerator.” If you see this entry, your computer has the Bluetooth capability to connect to the Finch Robot 2.0 or Hummingbird Bit.

Can I use your products if my device does not have built-in Bluetooth?
The original Finch Robot and the Hummingbird Duo Robotics Kit do not require a device with built-in Bluetooth. You can program the Hummingbird Bit Robotics Kit or Finch Robot 2.0 in MakeCode on devices that do not have built-in Bluetooth.
If you are using a Windows computer without Bluetooth capability and you want to program the Hummingbird Bit or Finch Robot 2.0 in the languages Java, Python, or Snap!, then you can to purchase an accessory (a USB Bluetooth and BLE dongle) that will give you a Bluetooth connection.
Please contact us at sales@birdbraintechnologies.com with further questions.
We know that so many teachers seek out support through DonorsChoose, and we hear from many when they don’t see the Finch Robot or Hummingbird Kit listed as an item to add to their project. Thankfully, there are paths to sourcing BirdBrain classroom tools, though they’re not as simple as we’d like. Here’s what we know:
- Special Request Projects
BirdBrain Technologies’ tools can be fundraised with a Special Request Project. This is not ideal. The requirements lead us to believe that you’ll have to have at least 2 projects funded before you can start a Special Request Project. It’s a big hurdle for all teachers, but especially those new to DonorsChoose. - Vendor Directory
The vendor directory for regular DonorsChoose projects is quite small. We’ve tried to become a vendor, but it’s not possible within the current system. Fortunately, you can access BirdBrain tools through an authorized reseller, School Specialty! Many teachers have had success working with School Specialty.
We hope that this changes in the future and it becomes easier for teachers to seek out support for new/unique classroom tools within DonorsChoose. We encourage you to reach out to DonorsChoose customer support for the most up-to-date information.
MacOS 13
Are you getting the Error 100093 or “Transfer timed out” message when trying to transfer a hex file to your micro:bit using MacOS 13? You’re not alone. Many users have reported this issue when trying to use the drag-and-drop method to transfer files to their micro:bit. The good news is that the micro:bit team is aware of this bug. You can find information regarding a workaround on micro:bit’s support article.
Chromebook
Is your micro:bit disappearing from Files after connecting via WebUSB direct flashing? This is because Chromebooks only allow one method of access to a device. If you would like your micro:bit to show up in Files, you will need to unpair your micro:bit from WebUSB direct flashing. To download your hex file, instead of pairing your micro:bit, you will need to click the three dots and click “Download as file.”
Normally downloaded files appear in Downloads, however, there is a way to get your program to download directly to your micro:bit. In a Chrome browser, click the three dots in the top right corner. In settings, click “advanced” and turn on “ask where to save each file” in the download section. You can find a video of this process on this webpage. Every student that logins will need to adjust these settings.
You can find more information on micro:bit’s support article.
Yes, the micro:bit processor in the Hummingbird Bit and Finch Robot 2 is the standard micro:bit that you find elsewhere, so you can use your existing micro:bit with either product. The Finch Robot 2 and Hummingbird Bit are compatible with both micro:bit V1 and micro:bit V2.
Both the Hummingbird Bit and the Finch Robot 2 do require a micro:bit to work, so if you do not already own a micro:bit you should purchase one with your robot.
The power behind the BirdBrain tools + micro:bit connection is that you get two learning tools combined into one! You can use the micro:bit to do separate projects that you would find on their website, but you are also able to take your learning to the next level by adding external components and multiple programming languages with the BirdBrain robots.
Glow & Cube FAQs
General Questions
Thank you for choosing Owlet for your K-5 students! To get started teaching with Owlet, check out our “Start Teaching” page. Here you will find information about how to download our apps, teacher guides, and printables–all for free!

Under “Choose your CubeTower” you will see a name with a sequence of colors that matches the three lights at the top of your Cube. If you have multiple Cubes in the classroom, each will have its own unique name and color sequence!

Under “Choose your GlowBoard” you will see the name with the symbol that matches the one on Glow’s LED array.

Tech Support
Swipe up from the bottom of the screen. You will see a gray bar appear.

Tap the square on the right in the gray bar. You will see a list of all the open apps. Swipe the app you want to close upward or tap the ‘x’ to close it.

Sometimes it takes up to a minute for the name to show up. If waiting 60 seconds does not solve the problem, try the following steps.
- Turn off your GlowBoard/CubeTower and power back on.
- Check the battery status of GlowBoard/CubeTower. If it is low (red), your device may not be able to detect the Owlet.
- Close and reopen the Owlet app.
- Try rebooting your device.
- If all else fails, make sure location and Bluetooth services have been enabled for the app.
If your Owlet and device are not communicating, try the steps below:
- Turn the power to the GlowBoard/CubeTower off and back on. You will see the disconnection alert appear. When powered back on, your Owlet should reconnect automatically. If not, tap the disconnection alert and reconnect to the device.

- Close and reopen the Owlet app, then reconnect to the device.
- Check the battery status of the GlowBoard/CubeTower. If it is low (red), the Kindle may not be able to keep a connection to the device.
All Owlet apps need location and Bluetooth permission in order to find your Owlet tool. When you first install the app, you will need to select “Allow” for both services.
If you have done the above and it is still not working, it may be caused by disabled location services in the Google Play settings menu. To find this menu and enable location services, please watch the video below.
If you are still unable to connect, please reach out to support@birdbraintechnologies.com
Hummingbird Bit FAQs
BirdBlox Tech Support
The fastest way to determine if there is an issue with your bluetooth connection is to use our troubleshooting tool. Please follow this link to our Interactive Support App.
Note: Kindle tablets and some Android tablets or smartphones can take up to 45 seconds to connect to the Hummingbird Bit.
If you have followed the BirdBlox set up procedure, and you have downloaded the BitFirmware.hex file onto your micro:bit and are still having trouble connecting your device there are a few steps you can take. If you experience any issues downloading the hex file, see our article titled, “Why is my BitFirmware.hex file not showing up on my micro:bit?”
- Go into your settings menu and check that bluetooth is enabled on your tablet or smartphone.
- Prior to any connection attempt, check to see if the micro:bit flashing 10 characters. If it is not, that may mean that the BitFirmware.hex file was not properly downloaded onto your micro:bit. If you are having trouble downloading the provided BitFirmware.hex file, see our article titled, “Why is my BitFirmware.hex file not showing up on my micro:bit?”
- Make sure you are running the most recent version of the BirdBlox application for IOS, Android, or Kindle.
- Do other devices with the BitFirmware.hex file appear in the BirdBlox “Connect Device” menu? If so, AND you can confirm that the micro:bit is flashing 10 characters, the issue is a faulty bluetooth emitter in the micro:bit and it will need to be replaced. Your Hummingbird Bit is likely functioning just fine. If needed, a new micro:bit can be ordered from our store.
- If you continue to have issues getting your micro:bit to appear as a device in the “Connect Device” menu in BirdBlox , please contact us at support@birdbraintechnologies.com with the subject heading “My Hummingbird Bit is not showing up as a device in BirdBlox.”
The fastest way to determine if there is an issue with your bluetooth connection is to use our troubleshooting tool. Please follow this link to our Interactive Support App.
The most common reason for a Hummingbird Bit to disconnect from BirdBlox is a lost bluetooth connection. In addition to the blocks becoming unresponsive, you will likely see 3 letters begin to flash on the micro:bit display, indicating that the micro:bit is no longer connected to BirdBlox. The bluetooth connection can be lost for a few reasons:
- Your tablet or smartphone fell asleep and bluetooth connection was lost. Some tablets and smartphones will not maintain bluetooth connection when asleep. This can cause the Hummingbird Bit to disconnect. In BirdBlox, you can reestablish a connection by disconnecting from your device and reconnecting it. We recommend adjusting your tablet or smartphone sleep settings as well.
- Your batteries may be low or the power connection is faulty. Low battery power will cause the Hummingbird Bit to disconnect. There is a battery life indicator in BirdBlox. Try switching out the batteries, then reconnect to BirdBlox.
- Make sure you are running the most recent version of the BirdBlox application for IOS, Android, or Kindle.
- If the problem persists, please contact us at support@birdbraintechnologies.com with the subject heading, “My Hummingbird Bit won’t maintain a connection to BirdBlox.”
The fastest way to determine if there is an issue with your LED is to perform a hardware test. To perform a hardware test on your Hummingbird LED, please follow this link to our Interactive Support App.
If your LEDs are functioning properly, there are a few other possibilities for why they may not be working, including coding errors.
- Check your LED connection. Is the LED plugged in correctly and securely? Watch the first video below to double check your LED connection.
- Make sure your micro:bit is plugged in securely.
- Check the orientation of the micro:bit. If your micro:bit is plugged into the Hummingbird Bit upside down (the micro:bit screen facing downwards), your components will not work.

- Make sure the Hummingbird Bit is still connected with a Bit Display test. A Bit Display test will help you quickly determine if there is a bluetooth connection between the Hummingbird Bit and your tablet or smartphone.
- Double check your LED code. In most cases, the issue can be solved through the code. To test your LED with accurate code, plug your LED into LED port 1 and copy this BirdBlox program. Watch the second video below to check your LED code.
- Check the device pull down menu. You may be looking at the wrong set of blocks. There are 3 pull-down menus, each menu dedicated to one of the 3 devices that BirdBlox can control: Hummingbird Bit, Hummingbird Duo, and the micro:bit. If your blocks are greyed out, it is possible that you are working with blocks that do not match your device. Make sure that you are pulling blocks from the menu that matches your device.
- If you have done steps 1-6 and the LED is still not responding, you may be dealing with a broken LED or a broken LED port on your Hummingbird Bit. Try the LED on another port (be sure to update your code to reflect the new port number).
- If the LED reacts, the issue is with the Hummingbird LED port.
- If the LED does not react, switch it out with a new LED. If the new LED reacts, your first LED was broken. Watch the third video below to see reasons why the LED may be broken.
- If needed, new components can be ordered from our store.

Watch this video to check your LED connection:
Watch this video to double check your LED code:
Watch this video to see why your LED may not be working properly:
The fastest way to determine if there is an issue with your Tri-Color LED is to perform a hardware test. To perform a hardware test on your Hummingbird Tri-Color LED, please follow this link to our Interactive Support App.
If your Tri-Color LEDs are functioning properly, there are a few other possibilities for why they may not be working, including coding errors.
- Check your tri-color LED connection. Is the tri-color LED plugged in correctly and securely? Watch the first video below to double check your tri-color LED connection.
- Make sure your micro:bit is plugged in securely.
- Make sure the Hummingbird Bit is still connected with a Bit Display test. A Bit Display test will help you quickly determine if there is a bluetooth connection between the Hummingbird Bit and your tablet or smartphone.
- Check the orientation of the micro:bit. If your micro:bit is plugged into the Hummingbird Bit upside down (the micro:bit screen facing downwards), your components will not work.
- Double check your tri-color LED code. In most cases, the issue can be solved through the code. To test your tri-color LED with accurate code, plug your tri-color LED into tri-color LED port 1 and copy this BirdBlox program. Watch the second video below to check your tri-color LED code.
- Check the device pull down menu. You may be looking at the wrong set of blocks. There are 3 pull-down menus, each menu dedicated to one of the 3 devices that BirdBlox can control: Hummingbird Bit, Hummingbird Duo, and the micro:bit. If your blocks are greyed out, it is possible that you are working with blocks that do not match your device. Make sure that you are pulling blocks from the menu that matches your device.
- If you have done steps 1-6 and the tri-color LED is still not responding, you may be dealing with a broken tri-color LED or a broken tri-color LED port on your Hummingbird Bit. Try the tri-color LED on another port (be sure to update your code to reflect the new port number).

-
- If the tri-color LED reacts, the issue is with the Hummingbird tri-color LED port.
- If the tri-color LED does not react, switch it out with a new tri-color LED. If the new tri-color LED reacts, your first tri-color LED was broken. Watch the third video below to see reasons why the tri-color LED may be broken. (Note: on TriLEDs it is possible for just 1 or 2 of the colors to burn out).
- If needed, new components can be ordered from our store.
Watch this video to check your tri-color LED connection:
Watch this video to double check your tri-color LED code:
Watch this video to see why your tri-color LED may not be working properly:
The fastest way to determine if there is an issue with your servos is to perform a hardware test. To perform a hardware test on your Hummingbird Servos, please follow this link to our Interactive Support App.
If your servos are functioning properly, there are a few other possibilities for why they may not be working, including coding errors.
- Check your power. The Hummingbird Bit USB cord provides enough power for LEDs but not servos, so for your servos to work your Hummingbird Bit must have power from a battery pack or A/C adapter. To check that you have enough power (including that your batteries are not running low) check to make sure the orange power light is bright, not dull, orange.
- Check your servo connection. Is the servo plugged in correctly and securely? Watch the first video below to double check your servo motor connection.
- Make sure your micro:bit is plugged in securely.
- Check the orientation of the micro:bit. If your micro:bit is plugged into the Hummingbird Bit upside down (the micro:bit screen facing downwards), your components will not work.
- Make sure the Hummingbird Bit is still connected with a Bit Display test. A Bit Display test will help you quickly determine if there is a bluetooth connection between the Hummingbird Bit and your tablet or smartphone.
- Double check your servo code. In most cases, the issue can be solved through the code. To test your servo motor with accurate code, plug your motor into servo port 1 and copy this BirdBlox Program for the motor you are using (position servo code; rotation servo code). Watch the second video below to check your servo motor code.
- Check the device pull down menu. You may be looking at the wrong set of blocks. There are 3 pull-down menus, each menu dedicated to one of the 3 devices that BirdBlox can control: Hummingbird Bit, Hummingbird Duo, and the micro:bit. If your blocks are greyed out, it is possible that you are working with blocks that do not match your device. Make sure that you are pulling blocks from the menu that matches your device.
- If you have done steps 1-6 and the servo motor is still not responding, you may be dealing with a broken servo motor or a broken servo port on your Hummingbird Bit. Try the servo motor on another port (be sure to update your code to reflect the new port number).
- If the servo motor reacts, the issue is with the Hummingbird servo port.
- If the servo does not react, switch it out with a new servo of the same type (Position, Rotation or micro servo). If the new servo reacts, your first servo was broken. Watch the third video below to see reasons why the servo motor may be broken.
- If needed, new components can be ordered from our store.


Watch this video to check your servo motor connection:
Watch this video to double check your servo motor code:
Watch this video to see why your servo motor may not be working properly:
The fastest way to determine if there is an issue with your sensors is to perform a hardware test. To perform a hardware test on your Hummingbird Sensors, please follow this link to our Interactive Support App.
If your sensors are functioning properly, there are a few other possibilities for why they may not be working, including coding errors.
- Check your sensor connection. Is the sensor plugged in correctly and securely? Are you using your sensor to activate a servo? If so, does your Hummingbird Bit have power from a battery pack or A/C adapter? Watch the first video below to double check your sensor connection.
- Make sure your micro:bit is plugged in securely.
- Check the orientation of the micro:bit. If your micro:bit is plugged into the Hummingbird Bit upside down (the micro:bit screen facing downwards), your components will not work.
- Make sure the Hummingbird Bit is still connected with a Bit Display test. A Bit Display test will help you quickly determine if there is a bluetooth connection between the Hummingbird Bit and your tablet or smartphone.
- Double check your sensor value. It is helpful to know what number your sensor is generating. Often, the code will be correct and the sensor will be returning a value, but that sensor value is not always intuitive. For instance, a project that uses the sound sensor may appear to behave erratically when tested in a loud room, or a project that uses a light sensor may behave differently on opposite sides of the room due to changes in the light level. Watch the second video below to see what number your sensor is generating.
- Double check your sensor code. In most cases, the issue can be solved through the code. To test your sensor with accurate code, plug an LED into LED port 1 and a light sensor into sensor port 1, adjust your sensor block and sensor threshold (see step 5), and then copy this BirdBlox program. Watch the third video below to check your sensor code.
- Check the device pull down menu. You may be looking at the wrong set of blocks. There are 3 pull-down menus, each menu dedicated to one of the 3 devices that BirdBlox can control: Hummingbird Bit, Hummingbird Duo, and the micro:bit. If your blocks are greyed out, it is possible that you are working with blocks that do not match your device. Make sure that you are pulling blocks from the menu that matches your device.
- If you have done steps 1-7 and the sensor is still not responding, you may be dealing with a broken sensor or a broken sensor port on your Hummingbird Bit. Try the sensor on another port (be sure to update your code to reflect the new port number).

-
- If the sensor reacts, the issue is with the Hummingbird sensor port.
- If the sensor does not react, switch it out with a different sensor. If the new sensor reacts, your first sensor was broken. Watch the fourth video below to see reasons why the servo motor may be broken.
- If needed, new components can be ordered from our store.
Watch this video to check your sensor connection:
Watch this video to see what number your sensor is generating:
Watch this video to double check your sensor code:
Watch this video to see why your sensor may not be working properly:
Is the micro:bit screen flashing 3 letters?
- If yes, follow this link to our Interactive Support App for troubleshooting solutions and then try to program in BirdBlox again.
- If no, select the Hummingbird Bit component that you are trying to control:
Yes! To AirDrop a file to a second iOS device, tap the File button in BirdBlox.
Then tap the Share button by the name of the file you wish to share.
Then select the AirDrop icon. Choose the device that should receive the file.
On the device that receives the file, select BirdBlox when asked how to open the file. The file will open in BirdBlox!
When your micro:bit is plugged into your computer via USB cable, two things should happen:
- The little yellow light on the bottom of the micro:bit should come on. This means the micro:bit is receiving power.
- The micro:bit should show up as a drive in your file explorer (Windows/Chromebook) or on your desktop (Mac). If the drive is showing up as “maintenance,” see our article titled, “Why is my micro:bit is in ‘maintenance mode?’“
If neither of these are happening, then there is a connection problem. The issue can often be solved by switching USB ports in the computer, or by switching out the USB cable. If that does not work, try a second micro:bit (if available) and see if that one connects.
If you are still unable to get power or see the micro:bit as a drive, then contact us at support@birdbraintechnologies.com and use the subject line “My micro:bit is not connecting to my computer.”
If your micro:bit is showing up as “MAINTENANCE” in your File Explorer window, rather than “MICROBIT,” then your micro:bit is in maintenance mode. This can happen when the reset button on the micro:bit is pressed while plugging in to your computer’s USB port (see image below).
In order to leave maintenance mode and be able to download your code follow these two easy steps:
Step 1:
Unplug the micro:bit from the USB cable, making sure the reset button is not pressed, and plug the micro:bit back in. The board should now show up as a drive titled “MICROBIT,” indicating it is back in normal operating mode.
Step 2:
If Step 1 wasn’t successful, you’ll need to download new firmware onto the micro:bit. Plug in your troubled micro:bit and click the purple “Download the latest micro:bit firmware” button about halfway down this webpage.
There are a few reasons why you may have to update your micro:bit firmware, but the most common reason is that the .hex file will not download to the micro:bit. Typically, when a .hex file is downloading, the yellow light on the back of the micro:bit will blink. If the yellow light does not blink during the download process, there is a good chance your firmware is out of date.
Follow these instructions from microbit.org to update your micro:bit firmware: https://microbit.org/guide/firmware/
A “.hex” file is the only file type that a micro:bit will read. Whether you are downloading your .hex file directly from an online language like MakeCode, or you are downloading a custom .hex file (like the BitFirmware.hex required for bluetooth connection) from our website, confirming that the .hex file is correctly downloading onto your micro:bit is important.
Note: While micro:bit may appear in your File Explorer (Windows/Chromebooks) or on your Desktop (Mac) as a drive, micro:bits do not behave like drives. When a .hex file is “copied” onto the micro:bit, that file will begin to automatically run as a program. The .hex file will not show up in the micro:bit as it would in a drive.
- Does your micro:bit show up as a drive in your file explorer (Windows/Chromebook) or on your desktop (Mac)? If not, then you will want to see our article titled, “Why is my micro:bit not showing up on my computer?”
- Do you know where your BitFirmware.hex file is being downloaded to? It is possible that the .hex file is downloading, but it is not going somewhere other than the micro:bit. See the video below for more information.
- When you copy or download the BitFimware.hex file onto the micro:bit, is the yellow light on the back of the micro:bit flashing? If not, your micro:bit firmware may need to be updated. Check out our article titled, “How do I update my micro:bit firmware?”
Yes! BirdBlox is compatible with a number of apps for saving files in the cloud, including Google Drive and Dropbox. To save a BirdBlox file in the cloud with one of these options, you must have the corresponding app on your tablet. For example, to use Google Drive with BirdBlox, you must first have the Google Drive app installed. We will demonstrate how to export a file to Google Drive, but the process is similar for Dropbox.
To save a file to Google Drive, tap the File button in BirdBlox.
Then tap the Share button by the name of the file you wish to share.
Then select the Google Drive icon. You have saved the file to Google Drive!
To open a file from Google Drive, navigate to the file in the Google Drive app, then tap the three dots to the right of the file name.
Select Open in.
Then select Copy to BirdBlox (iOS). You may need to scroll to the right to see this option. On Android, the file may open automatically when you select Open in.
Note: In iOS, You can also use the Cloud button in BirdBlox to browse to Google Drive and open a BirdBlox file that is saved in Google Drive.
General Questions
The BlueBird Connector requires that your computer be able to use Bluetooth 4.0 to connect to the Finch Robot or the Hummingbird Bit. There area few reasons that you may see this message:
- You will see this message if your device does not have Bluetooth capability. If you are using Windows and your device does not have built-in Bluetooth, you can use a Bluetooth dongle to add this capability. For more information, see Do your products require a device with Bluetooth capability?
- You will see this message if the built-in Bluetooth on your device is not turned on. Check to be sure that Bluetooth is enabled.
- You are running an old version of the BlueBird Connector. If you are using Windows and installed the BlueBird Connector before September 15, 2021, you need to install a newer version in order to use your device’s built-in Bluetooth.
The following steps assume that you have properly followed the Snap! set up procedure, and you have downloaded the BitFirmware.hex file onto your micro:bit. If you experienced any issues downloading the hex file, see our article titled, ”Why is my MakeCode program/.hex file not showing up on my micro:bit?”
- Are you getting a “Connection Failure” message? See our article titled “Why am I getting ‘Connection Failure’ message in the BlueBird Connector?”
- Prior to any connection attempt, check to see if the micro:bit flashing 10 characters. If it is not, that may mean that the BitFirmware.hex file was not properly downloaded onto your micro:bit. If you are having trouble downloading the provided BitFirmware.hex file, see our article titled, “Why is my BitFirmware.hex file not showing up on my micro:bit?”
- Make sure you are running the most recent version of the BlueBird Connector. You can find the most up-to-date applications here for Mac or Windows.
- Do other devices with the BitFirmware.hex file appear in the BlueBird Connector? If so, AND you can confirm that the micro:bit is flashing 10 characters, the issue is a faulty bluetooth emitter in the micro:bit and it will need to be replaced. Your Hummingbird Bit is likely functioning just fine. If you have another micro:bit, switch it out and see if the BlueBird Connector detects it.
- If you continue to have issues getting your micro:bit to appear as a device in the “Connect Device” menu in Snap!, please contact us at support@birdbraintechnologies.com with the subject heading “My Hummingbird Bit is not showing up as a device in Snap!.”
If your Hummingbird Bit has disconnected, first check to see if it has lost its bluetooth connection. If your blocks are unresponsive and the micro:bit display is flashing ten letters, the micro:bit is no longer connected. The bluetooth connection can be lost for a few reasons:
- Make sure the BlueBird Connector is still open. The BlueBird Connector needs to remain open in the background in order to maintain connection to Snap!.
- Your computer may have fallen asleep and lost the bluetooth connection. Some computers will not maintain bluetooth connection when asleep. This can cause the Hummingbird Bit to disconnect. In the BlueBird Connector, you can reestablish a connection by disconnecting from your device and reconnecting it. We recommend adjusting your computer sleep settings as well.
- Your batteries may be low or the power connection is faulty. Low battery power will cause the Hummingbird Bit to disconnect. There may be enough battery life to power the micro:bit’s display, but not enough battery power to maintain a consistent bluetooth connection. There is a battery life indicator in the BlueBird Connector. Try switching out the batteries, then reconnect to the BlueBird Connector.
- Make sure you are running the most recent version of the BlueBird Connector application for Mac or Windows.
If the problem persists, please contact us at support@birdbraintechnologies.com with the subject heading “My Hummingbird Bit won’t maintain a connection the BlueBird Connector.”
No, a 9V battery will damage your Hummingbird. The maximum voltage you should use with your Hummingbird is 7V. Any power supply for Hummingbird should have a voltage between 4.5V and 7V and a current rating of at least 1 amp (2 amps if you intend to run 3 or more servos).
We recommend our rechargeable power banks! With these power banks, you can expect to run a Hummingbird Robot with two active motors for 6+ hours. The power bank also includes an LED indicator light, letting you know the charging status
You can also purchase a battery pack or a power adapter for the Hummingbird Robotics Kit.
With Amazon Non-rechargeable batteries, with four servos running, the batteries should last around 3-4 hours. With Rechargeable batteries which are charged completely, the batteries should last around 5-6 hours.
With our rechargeable power banks, with four servos running nonstop, the power bank should last 4 hours.
The screws you need are 2.6mm Thread-Forming Screw (8mm Length).
We do not sell replacement screws, but you can follow this link to purchase more screws for your servos.
Hummingbird’s four servo ports are designed for compatibility with 6V RC analog servos. The servo signals pulse every 20ms and have a programmable up-time between 0.6 and 2.4ms. The servos share the battery power supply, and the total current draw combined for all servos, LEDs, and sensors, should not exceed 2000 mA.
We made the extensions port in order to develop additional accessories for Hummingbird Bit that do not fit into the standard LEDs, Sensors, or Servos categories. No such accessories have yet been released.
For now, you can hack the extensions port to provide access to the micro:bit’s I2C (Pin 19/20), as well as micro:bit pin 1, battery power, and ground. To get access to these pins, take an RJ-12 6p6c cable and plug it in; we recommend a short 1 foot cable to minimize noise and power drop. Plug the other end into an RJ-12 breakout board. The pin mapping is as follows:
1 – Not connected
2 – Micro:bit Pin 1
3 – GND
4 – Battery Pack Voltage
5 – I2C SDA (Micro:bit Pin 20)
6 – I2C SCL (Micro:bit Pin 19)
Please note that a voltage divider exists on the Hummingbird Bit before the signal reaches Pin 1 of the micro:bit – the signal’s voltage is divided by a factor of 2.5 via a 1.5k and 1k resistor in a voltage divider configuration.
There is a polyfuse on the Hummingbird Bit that prevents the total current draw of all components (servos, LEDs, etc) attached to the board from exceeding two amps. As such, ensure any extensions you attach draw less than one amp to prevent browning out the controller.
We recommend a 4 AA battery pack, our rechargeable power bank, or a 5V, 2A power adapter.
Any power supply for Hummingbird should have a voltage between 4.5V and 7V and a current rating of at least 1 amp (2 amps if you intend to run 3 or more servos). The maximum voltage you should use with your Hummingbird is 7V.
Here is a chart which explains which parts of the Hummingbird Robotics Kits are compatible with the other version.
Yes, we have printable troubleshooting cards for the Hummingbird Bit in BirdBlox, MakeCode, and Snap!. These cards give hardware, connection, and programming debugging tips. Print a deck for each student group!
For step-by-step troubleshooting and hardware tests, you can also visit our Interactive Support App.
Yes, the Hummingbird Bit is compatible with both micro:bit V1 and micro:bit V2.
Our products support block-based coding languages including BirdBlox, Snap!, and MakeCode. Snap!, a programming language very similar to Scratch, that was created by UC Berkeley, is used in the Beauty and Joy of Computing curriculum, which is an AP CS Principles curriculum used country-wide. You can learn more about Snap! here and more about using the our products with Snap! here.
Check out this video of how to attach servo horns and wheels!
The small black screws that comes with the servo can be used to secure a servo horn to the servo spline (the white gear shaped shaft). This is helpful if you make a project where there is a lot of strain on the servo horn, potentially causing the horn to pop off. To secure the horn with the screw, place the horn on the servo spline, then put the black screw in the central hole of the servo horn and screw it in using a Philips screwdriver.
The silver screws in the servo accessories bag can be threaded into the small holes in the servo horns to attach linkages or other materials to the servo horns.
The copper colored rings can be used to mount the servo to wood.
We do not sell replacement servo horns, but you can purchase more at the links below.
For Hummingbird Bit Servos (Feetech FS5103B and FS5103R), please visit this webpage.
For Hummingbird Duo Servos (Hitec HS-311), please visit this webpage.
Many of our Hummingbird components are uniquely compatible with the Hummingbird controller while others are not.
Our sensors are uniquely engineered to produce meaningful data (common units of measure) in each of the programming environments, and we know that the voltage requirements are compatible. Basically, we have done the breadboarding for you with our sensors, so you don’t need to add a resistor or anything like that. You can use other sensors, but they must be analog sensors that take a 3V supply. You would need to look through the datasheet for any additional circuitry requirements, so using third-party sensors is a little tricky.
Other parts like the LEDs and servos have not been altered and are more commonly available. Third-party LEDs and servos should work just like our components when you use them with the Hummingbird controller. Servos should draw less than 500 mA of current in free-running mode.
Due to a variation in voltage, AA rechargeable batteries may not turn on the green status light on your Hummingbird Bit controller. You may also note that the battery indicator icon in BirdBlox, Snap!, and BlueBird Connector may show a low battery status, which is due to the variation of voltage in rechargeable batteries.
Instead of AA batteries, we recommend our rechargeable power banks! With these power banks, you can expect to run a Hummingbird Robot with two active motors for 6+ hours. The power bank also includes an LED indicator light, letting you know the charging status.
If you have any questions about our rechargeable power banks, please email support@birdbraintechnologies.com
MakeCode Tech Support
An icon test will help you determine if the .hex file is downloading onto your micro:bit. This can be done by simply putting a “show icon” block in the “on start” loop and downloading the program.
If you are unable to get an icon to show up on your micro:bit screen, visit our article that answers the question “Why is my MakeCode program/.hex file not downloading onto my micro:bit?“
There are a few reasons why your .hex file (the type of file that is created in MakeCode) may not download to your micro:bit. A “.hex” file is the only file type that a micro:bit will read. Whether you are downloading your .hex file directly from MakeCode, or you are downloading a custom .hex file (like the BitFirmware.hex required for bluetooth connection) from our website, confirming that the .hex file is actually copied onto your micro:bit is important.
Note: While micro:bit may appear in your File Explorer (Windows/Chromebooks) or on your Desktop (Macs) as a drive, micro:bits do not behave like drives. When a .hex file is “copied” onto the micro:bit, that file will begin to automatically run as a program. The .hex file will not show up in the micro:bit as it would in your typical drive.
Here are some reasons why your .hex file may not be downloaded to your micro:bit:
- Your computer is not connecting to your micro:bit. Check to see if your micro:bit is showing up as a drive in your file explorer (Windows/Chromebook) or on your desktop (Mac). If not, then you will want to see our article titled, “Why is my micro:bit not showing up on my computer?“
- Your .hex file is downloading somewhere other than your micro:bit. It is possible that the .hex file is downloading to your computer, but it is not going directly to the micro:bit (see video below). If you would like to change your download settings, visit out setup module for MakeCode and Hummingbird Bit.
- You have a hardware or coding issue. It is possible that the file is making it onto the micro:bit, but due to a hardware issue or a coding issue, the code is not behaving as expected. Do an icon test to make sure the code is making it onto your micro:bit.
- Your micro:bit needs a firmware update. When you copy or download the .hex file to the micro:bit, the yellow light on the back of the micro:bit should flash. If the light is not flashing, your firmware may need to be updated. Learn more about updating your micro:bit firmware through our article, “How do I update my micro:bit firmware?“
- You are using MacOS 13 or Chromebook. There are known bugs regarding .hex file downloading and these devices. See more information regarding these our article titled, “Why is my MakeCode program/.hex file not downloading onto my micro:bit? (Chromebook and MacOS 13 specific)“
The fastest way to determine if there is an issue with your LED is to perform a hardware test. To perform a hardware test on your Hummingbird LED, please follow this link to our Interactive Support App.
If your LEDs are functioning properly, there are a few other possibilities for why they may not be working, including coding errors.
- Check your LED connection. Is the LED plugged in correctly and securely? Watch the first video below to double check your LED connection.
- Make sure your micro:bit is plugged in securely.
- Check the orientation of the micro:bit. If your micro:bit is plugged into the Hummingbird Bit upside down (the micro:bit screen facing downwards), your components will not work.
- Make sure the program is downloading correctly with an icon test. If you put a “show icon” block in the “on start” loop and then download the file, you can ensure that the .hex file is being sent to the micro:bit. Visit this article to learn more.
- Double check your LED code. In most cases, the issue can be solved through the code. To test your LED with accurate code, open this MakeCode program, plug in your LED into LED port 1, and download the code onto your micro:bit. Watch the second video below to check your LED code.
- Make sure you are using correct Hummingbird blocks. There are 2 sets of Hummingbird blocks available in MakeCode: blocks for the Hummingbird Bit and blocks for the Hummingbird Duo using the micro:bit adapter. If you used our recommended setup procedure for MakeCode, you were connected to a project preloaded with blocks for the Hummingbird Bit.
- Click here to connect to a project with Hummingbird Bit blocks loaded.
- Click here to connect to a project with the Hummingbird Duo blocks loaded (only for users with the Hummingbird Duo + micro:bit adapter).
- If you have done steps 1-6 and the LED is still not responding, you may be dealing with a broken LED or a broken LED port on your Hummingbird Bit. Try the LED on another port (be sure to update your code to reflect the new port number).
- If the LED reacts, the issue is with the previous Hummingbird LED port.
- If the LED does not react, switch it out with a new LED. If the new LED reacts, your first LED was broken. Watch the third video below to see reasons why the LED may be broken.
- If needed, new components can be ordered from our store.
Watch this video to check your LED connection:
Watch this video to double check your LED code:
Watch this video to see why your LED may not be working properly:
The fastest way to determine if there is an issue with your tri-color LED is to perform a hardware test. To perform a hardware test on your Hummingbird Tri-Color LED, please follow this link to our Interactive Support App.
If your Tri-Color LEDs are functioning properly, there are a few other possibilities for why they may not be working, including coding errors.
- Check your tri-color LED connection. Is the tri-color LED plugged in correctly and securely? Watch the first video below to double check your tri-color LED connection.
- Make sure your micro:bit is plugged in securely.
- Check the orientation of the micro:bit. If your micro:bit is plugged into the Hummingbird Bit upside down (the micro:bit screen facing downwards), your components will not work.
- Make sure the program is downloading correctly with an icon test. If you put a “show icon” block in the “on start” loop and then download the file, you can ensure that the .hex file is being sent to the micro:bit. Visit this article to learn more.
- Double check your tri-color LED code. In most cases, the issue can be solved through the code. To test your tri-color LED with accurate code, open this MakeCode program, plug in your tri-color LED into tri-color LED port 1, and download the code onto your micro:bit. Watch the second video below to check your tri-color LED code.
- Make sure you are using correct Hummingbird blocks. There are 2 sets of Hummingbird blocks available in MakeCode: blocks for the Hummingbird Bit and blocks for the Hummingbird Duo using the micro:bit adapter. If you used our recommended setup procedure for MakeCode, you were connected to a project preloaded with blocks for the Hummingbird Bit.
- Click here to connect to a project with Hummingbird Bit blocks loaded.
- Click here to connect to a project with the Hummingbird Duo blocks loaded (only for users with the Hummingbird Duo + micro:bit adapter).
- If you have done steps 1-6 and the tri-color LED is still not responding, you may be dealing with a broken tri-color or a broken tri-color port on your Hummingbird Bit. Try the tri-color LED on another port (be sure to update your code to reflect the new port number).
-
- If the tri-color LED reacts, the issue is with the Hummingbird tri-color port.
- If the tri-color LED does not react, switch it out with a new tri-color LED. If the new tri-color LED reacts, your first tri-color was broken. Watch the third video below to see reasons why the LED may be broken. (Note: On tri-color LEDs it is possible for just 1 or 2 of the colors to burn out)
- If needed, new components can be ordered from our store.
Watch this video to check your tri-color LED connection:
Watch this video to double check your tri-color LED code:
Watch this video to see why your tri-color LED may not be working properly:
The fastest way to determine if there is an issue with your servo is to perform a hardware test. To perform a hardware test on your Hummingbird Servos, please follow this link to our Interactive Support App.
If your servos are functioning properly, there are a few other possibilities for why they may not be working, including coding errors.
- Check your power. The Hummingbird Bit USB cord provides enough power for LEDs but not servos, so for your servos to work your Hummingbird Bit must have power from a battery pack or AC adapter. To check that you have enough power (including that your batteries are not running low) check to make sure the orange power light is bright, not dull, orange.
- Check your servo connection. Is the servo motor plugged in correctly and securely? Does your Hummingbird Bit have power from a battery pack or AC adapter? Watch the first video below to double check your servo motor connection.
- Make sure your micro:bit is plugged in securely.
- Check the orientation of the micro:bit. If your micro:bit is plugged into the Hummingbird Bit upside down (the micro:bit screen facing downwards), your components will not work.
- Make sure the program is downloading correctly with an icon test. If you put a “show icon” block in the “on start” loop and then download the file, you can ensure that the .hex file is being sent to the micro:bit. Visit this article to learn more.
- Double check your servo code. In most cases, the issue can be solved through the code. To test your servo motor with accurate code, open the MakeCode program for the motor you are using (position servo code; rotation servo code), plug in your servo motor into servo port 1, and download the code onto your micro:bit. Watch the second video below to check your servo motor code.
- Make sure you are using correct Hummingbird blocks. There are 2 sets of Hummingbird blocks available in MakeCode: blocks for the Hummingbird Bit and blocks for the Hummingbird Duo using the micro:bit adapter. If you used our recommended setup procedure for MakeCode you were connected to a project preloaded with blocks for the Hummingbird Bit.
- Click here to connect to a project with Hummingbird Bit blocks loaded.
- Click here to connect to a project with the Hummingbird Duo blocks loaded (only for users with the Hummingbird Duo + micro:bit adapter).
- If you have done steps 1-6 and the servo motor is still not responding, you may be dealing with a broken servo motor or a broken servo port on your Hummingbird Bit. Try the servo motor on another port (be sure to update your code to reflect the new port number).
- If the servo motor reacts, the issue is with the Hummingbird servo port.
- If the servo does not react, switch it out with a new servo of the same type (position, rotation, or micro servo). If the new servo reacts, your first servo was broken. Watch the third video below to see reasons why the servo motor may be broken.
- If needed, new components can be ordered from our store.
Watch this video to check your servo motor connection:
Watch this video to double check your servo motor code:
Watch this video to see why your servo motor may not be working properly:
The fastest way to determine if there is an issue with your sensors is to perform a hardware test. To perform a hardware test on your Hummingbird Sensors, please follow this link to our Interactive Support App.
If your sensors are functioning properly, there are a few other possibilities for why they may not be working, including coding errors.
- Check your sensor connection. Is the sensor plugged in correctly and securely? Are you using your sensor to activate a servo? If so, does your Hummingbird Bit have power from a battery pack or A/C adapter? Watch the first video below to double check your sensor connection.
- Make sure your micro:bit is plugged in securely.
- Check the orientation of the micro:bit. If your micro:bit is plugged into the Hummingbird Bit upside down (the micro:bit screen facing downwards), your components will not work.
- Make sure the program is downloading correctly with an icon test. If you put a “show icon” block in the “on start” loop and then download the file, you can ensure that the .hex file is being sent to the micro:bit. Visit this article to learn more.
- Double check your sensor data. It is helpful to know what number your sensor is generating. Often, the code will be correct and the sensor will be returning a value, but that sensor value is not always intuitive. For instance, a project that uses the sound sensor may appear to be behave erratically when tested in a loud room, or a project that uses a light sensor may behave differently on opposite sides of the room due to changes in the light level. Watch the second video below to see what number your sensor is generating.
- Double check your sensor code. In most cases, the issue can be solved through the code. To test your sensor with accurate code, open this MakeCode program, plug in an LED into LED port 1 and a light sensor into sensor port 1, adjust your sensor block and sensor threshold (see step 4), and download the code onto your micro:bit. Watch the third video below to check your sensor code.
- Make sure you are using correct Hummingbird blocks. There are 2 sets of Hummingbird blocks available in MakeCode: blocks for the Hummingbird Bit and blocks for the Hummingbird Duo using the micro:bit adapter. If you used our recommended setup procedure for MakeCode you were connected to a project preloaded with blocks for the Hummingbird Bit.
- Click here to connect to a project with Hummingbird Bit blocks loaded.
- Click here to connect to a project with the Hummingbird Duo blocks loaded (only for users with the Hummingbird Duo + micro:bit adapter).
- If you have done steps 1-7 and the sensor is still not responding, you may be dealing with a broken sensor or a broken sensor port on your Hummingbird Bit. Try the sensor on another port (be sure to update your code to reflect the new port number).
- If the sensor reacts, the issue is with the Hummingbird sensor port.
- If the sensor does not react, switch it out with a different sensor. If the new sensor reacts, your first sensor was broken. Watch the fourth video below to see reasons why the servo motor may be broken.
- If needed, new components can be ordered from our store.
Watch this video to check your sensor connection:
Watch this video to see what number your sensor is generating:
Watch this video to double check your sensor code:
Watch this video to see why your sensor may not be working properly:
When your micro:bit is plugged into your computer via USB cable, two things should happen:
- The little yellow light on the bottom of the micro:bit should come on. This means the micro:bit is receiving power.
- The micro:bit should show up as a drive in your file explorer (Windows/Chromebook) or on your desktop (Mac). If the drive is showing up as “maintenance,” see our article titled, “Why is my micro:bit is in ‘maintenance mode?’“
If neither of these are happening, then there is a connection problem. The issue can often be solved by switching USB ports in the computer, or by switching out the USB cable. If that does not work, try a second micro:bit (if available) and see if that one connects.
If you are still unable to get power or see the micro:bit as a drive, then contact us at support@birdbraintechnologies.com and use the subject line “My micro:bit is not connecting to my computer.”
If your micro:bit is showing up as “MAINTENANCE” in your File Explorer window, rather than “MICROBIT,” then your micro:bit is in maintenance mode. This can happen when the reset button on the micro:bit is pressed while plugging in to your computer’s USB port (see image below).
In order to leave maintenance mode and be able to download your code follow these two easy steps:
Step 1:
Unplug the micro:bit from the USB cable, making sure the reset button is not pressed, and plug the micro:bit back in. The board should now show up as a drive titled “MICROBIT,” indicating it is back in normal operating mode.
Step 2:
If Step 1 wasn’t successful, you’ll need to download new firmware onto the micro:bit. Plug in your troubled micro:bit and click the purple “Download the latest micro:bit firmware” button about halfway down this webpage.
There are a few reasons why you may have to update your micro:bit firmware, but the most common reason is that the .hex file will not download to the micro:bit. Typically, when a .hex file is downloading, the yellow light on the back of the micro:bit will blink. If the yellow light does not blink during the download process, there is a good chance your firmware is out of date.
Follow these instructions from microbit.org to update your micro:bit firmware: https://microbit.org/guide/firmware/
A “.hex” file is the only file type that a micro:bit will read. Whether you are downloading your .hex file directly from an online language like MakeCode, or you are downloading a custom .hex file (like the BitFirmware.hex required for bluetooth connection) from our website, confirming that the .hex file is correctly downloading onto your micro:bit is important.
Note: While micro:bit may appear in your File Explorer (Windows/Chromebooks) or on your Desktop (Mac) as a drive, micro:bits do not behave like drives. When a .hex file is “copied” onto the micro:bit, that file will begin to automatically run as a program. The .hex file will not show up in the micro:bit as it would in a drive.
- Does your micro:bit show up as a drive in your file explorer (Windows/Chromebook) or on your desktop (Mac)? If not, then you will want to see our article titled, “Why is my micro:bit not showing up on my computer?”
- Do you know where your BitFirmware.hex file is being downloaded to? It is possible that the .hex file is downloading, but it is not going somewhere other than the micro:bit. See the video below for more information.
- When you copy or download the BitFimware.hex file onto the micro:bit, is the yellow light on the back of the micro:bit flashing? If not, your micro:bit firmware may need to be updated. Check out our article titled, “How do I update my micro:bit firmware?”
MakeCode automatically saves programs on the device that you are using. However, these programs may be deleted if your browser history is deleted. This will describe ways to save a program more permanently or share it with another person.
Downloading a File
Instead of downloading a program’s .hex file to the Finch, you can download it to your computer or Chromebook. After clicking Download, select the location where you want to save the .hex file and click Save. You can then email the file, store it on a USB drive, or treat it as you would any other file.
Loading a File
To load a file that you have saved in a .hex file, click on the Home button in MakeCode. From the home screen, click on the Import button.
Click on Import File.
Click on Choose File and navigate to the file you saved. Select it and then click Go ahead! Your file will open in MakeCode.
Sharing a File
To share a file, click on the Share button in MakeCode
Click Publish Project.
MakeCode will show you a link that you can share with others. Alternatively, you can also click Embed to see code to embed your project in a website.
No, it is not possible to use Bluetooth to download your MakeCode program to your Hummingbird Bit. While it is possible to send hex files to a micro:bit using Bluetooth, the MakeCode Bluetooth capability does not work reliably with the Hummingbird Bit. Instead, you will need to use the USB cable to send hex files to your Hummingbird Bit.
If you are interested in using Bluetooth, we encourage you to check out our tutorials for BirdBlox, Snap!, Python, or Java.
Snap! Tech Support
A “.hex” file is the only file type that a micro:bit will read. Whether you are downloading your .hex file directly from an online language like MakeCode, or you are downloading a custom .hex file (like the BitFirmware.hex required for bluetooth connection) from our website, confirming that the .hex file is correctly downloading onto your micro:bit is important.
Note: While micro:bit may appear in your File Explorer (Windows/Chromebooks) or on your Desktop (Mac) as a drive, micro:bits do not behave like drives. When a .hex file is “copied” onto the micro:bit, that file will begin to automatically run as a program. The .hex file will not show up in the micro:bit as it would in a drive.
- Does your micro:bit show up as a drive in your file explorer (Windows/Chromebook) or on your desktop (Mac)? If not, then you will want to see our article titled, “Why is my micro:bit not showing up on my computer?”
- Do you know where your BitFirmware.hex file is being downloaded to? It is possible that the .hex file is downloading, but it is not going somewhere other than the micro:bit. See the video below for more information.
- When you copy or download the BitFimware.hex file onto the micro:bit, is the yellow light on the back of the micro:bit flashing? If not, your micro:bit firmware may need to be updated. Check out our article titled, “How do I update my micro:bit firmware?”
There are a few reasons why you may have to update your micro:bit firmware, but the most common reason is that the .hex file will not download to the micro:bit. Typically, when a .hex file is downloading, the yellow light on the back of the micro:bit will blink. If the yellow light does not blink during the download process, there is a good chance your firmware is out of date.
Follow these instructions from microbit.org to update your micro:bit firmware: https://microbit.org/guide/firmware/
If your micro:bit is showing up as “MAINTENANCE” in your File Explorer window, rather than “MICROBIT,” then your micro:bit is in maintenance mode. This can happen when the reset button on the micro:bit is pressed while plugging in to your computer’s USB port (see image below).
In order to leave maintenance mode and be able to download your code follow these two easy steps:
Step 1:
Unplug the micro:bit from the USB cable, making sure the reset button is not pressed, and plug the micro:bit back in. The board should now show up as a drive titled “MICROBIT,” indicating it is back in normal operating mode.
Step 2:
If Step 1 wasn’t successful, you’ll need to download new firmware onto the micro:bit. Plug in your troubled micro:bit and click the purple “Download the latest micro:bit firmware” button about halfway down this webpage.
When your micro:bit is plugged into your computer via USB cable, two things should happen:
- The little yellow light on the bottom of the micro:bit should come on. This means the micro:bit is receiving power.
- The micro:bit should show up as a drive in your file explorer (Windows/Chromebook) or on your desktop (Mac). If the drive is showing up as “maintenance,” see our article titled, “Why is my micro:bit is in ‘maintenance mode?’“
If neither of these are happening, then there is a connection problem. The issue can often be solved by switching USB ports in the computer, or by switching out the USB cable. If that does not work, try a second micro:bit (if available) and see if that one connects.
If you are still unable to get power or see the micro:bit as a drive, then contact us at support@birdbraintechnologies.com and use the subject line “My micro:bit is not connecting to my computer.”
The fastest way to determine if there is an issue with your LED is to perform a hardware test. To perform a hardware test on your Hummingbird LED, please follow this link to our Interactive Support App.
If your LEDs are functioning properly, there are a few other possibilities for why they may not be working, including coding errors.
- Check your LED connection. Is the LED plugged in correctly and securely? Watch the first video below to double check your LED connection.
- Make sure your micro:bit is plugged in securely.
- Check the orientation of the micro:bit. If your micro:bit is plugged into the Hummingbird Bit upside down (the micro:bit screen facing downwards), your components will not work.
- Make sure the Hummingbird Bit is still connected with a Bit Display test. A Bit Display test will help you quickly determine if there is a connection between the BlueBird Connector and Snap!.
- Double check your LED code. In most cases, the issue can be solved through the code. To test your LED with accurate code, plug your LED into LED port 1 and copy this Snap! program. Watch the second video below to check your LED code.
- If you have done steps 1-5 and the LED is still not responding, you may be dealing with a broken LED or a broken LED port on your Hummingbird Bit. Try the LED on another port (be sure to update your code to reflect the new port number).

-
- If the LED reacts, the issue is with the Hummingbird LED port.
- If the LED does not react, switch it out with a new LED. If the new LED reacts, your first LED was broken. Watch the third video below to see reasons why the LED may be broken.
- If needed, new components can be ordered from our store.
Watch this video to check your LED connection:
Watch this video to double check your LED code:
Watch this video to see why your LED may not be working properly:
The fastest way to determine if there is an issue with your Tri-Color LED is to perform a hardware test. To perform a hardware test on your Hummingbird Tri-Color LED, please follow this link to our Interactive Support App.
If your Tri-Color LEDs are functioning properly, there are a few other possibilities for why they may not be working, including coding errors.
- Check your tri-color LED connection. Is the tri-color LED plugged in correctly and securely? Watch the first video below to double check your tri-color LED connection.
- Make sure your micro:bit is plugged in securely.
- Check the orientation of the micro:bit. If your micro:bit is plugged into the Hummingbird Bit upside down (the micro:bit screen facing downwards), your components will not work.
- Make sure the Hummingbird Bit is still connected with a Bit Display test. A Bit Display test will help you quickly determine if there is a connection between the BlueBird Connector and Snap!.
- Double check your tri-color LED code. In most cases, the issue can be solved through the code. To test your tri-color LED with accurate code, plug your tri-color LED into tri-color LED port 1 and copy this Snap! program. Watch the second video below to check your tri-color LED code.
- If you have done steps 1-5 and the tri-color LED is still not responding, you may be dealing with a broken tri-color LED or a broken tri-color LED port on your Hummingbird Bit. Try the tri-color LED on another port (be sure to update your code to reflect the new port number).

-
- If the tri-color LED reacts, the issue is with the Hummingbird tri-color LED port.
- If the tri-color LED does not react, switch it out with a new tri-color LED. If the new tri-color LED reacts, your first tri-color LED was broken. Watch the third video below to see reasons why the tri-color LED may be broken. (Note: on tri-color LEDs it is possible for just 1 or 2 of the colors to burn out).
- If needed, new components can be ordered from our store.
Watch this video to check your tri-color LED connection:
Watch this video to double check your tri-color LED code:
Watch this video to see why your tri-color LED may not be working properly:
The fastest way to determine if there is an issue with your servos is to perform a hardware test. To perform a hardware test on your Hummingbird Servos, please follow this link to our Interactive Support App.
If your servos are functioning properly, there are a few other possibilities for why they may not be working, including coding errors.
- Check your power. The Hummingbird Bit USB cord provides enough power for LEDs but not servos, so for your servos to work your Hummingbird Bit must have power from a battery pack or A/C adapter. To check that you have enough power (including that your batteries are not running low) check to make sure the orange power light is bright, not dull, orange.
- Check your servo connection. Is the servo plugged in correctly and securely? Does your Hummingbird Bit have power from a battery pack or A/C adapter? Watch the first video below to double check your servo motor connection.
- Make sure your micro:bit is plugged in securely.
- Check the orientation of the micro:bit. If your micro:bit is plugged into the Hummingbird Bit upside down (the micro:bit screen facing downwards), your components will not work.
- Make sure the Hummingbird Bit is still connected with a Bit Display test. A Bit Display test will help you quickly determine if there is a connection between the BlueBird Connector and Snap!.
- Double check your servo code. In most cases, the issue can be solved through the code. To test your servo motor with accurate code, plug your motor into servo port 1 and copy this Snap! Program for the motor you are using (position servo code; rotation servo code). Watch the second video below to check your servo motor code.
- If you have done steps 1-5 and the servo motor is still not responding, you may be dealing with a broken servo motor or a broken servo port on your Hummingbird Bit. Try the servo motor on another port (be sure to update your code to reflect the new port number).
- If the servo motor reacts, the issue is with the Hummingbird servo port.
- If the servo does not react, switch it out with a new servo of the same type (position, rotation, or micro servo). If the new servo reacts, your first servo was broken. Watch the third video below to see reasons why the servo motor may be broken.
- If needed, new components can be ordered from our store.


Watch this video to check your servo motor connection:
Watch this video to double check your servo motor code:
Watch this video to see why your servo motor may not be working properly:
The fastest way to determine if there is an issue with your sensors is to perform a hardware test. To perform a hardware test on your Hummingbird Sensors, please follow this link to our Interactive Support App.
If your sensors are functioning properly, there are a few other possibilities for why they may not be working, including coding errors.
- Check your sensor connection. Is the sensor plugged in correctly and securely? Are you using your sensor to activate a servo? If so, does your Hummingbird Bit have power from a battery pack or A/C adapter? Watch the first video below to double check your sensor connection.
- Make sure your micro:bit is plugged in securely.
- Check the orientation of the micro:bit. If your micro:bit is plugged into the Hummingbird Bit upside down (the micro:bit screen facing downwards), your components will not work.
- Make sure the Hummingbird Bit is still connected with a Bit Display test. A Bit Display test will help you quickly determine if there is a connection between the BlueBird Connector and Snap!.
- Double check your sensor value. It is helpful to know what number your sensor is generating. Often, the code will be correct and the sensor will be returning a value, but that sensor value is not always intuitive. For instance, a project that uses the sound sensor may appear to behave erratically when tested in a loud room, or a project that uses a light sensor may behave differently on opposite sides of the room due to changes in the light level. Watch the second video below to see what number your sensor is generating.
- Double check your sensor code. In most cases, the issue can be solved through the code. To test your sensor with accurate code, plug an LED into LED port 1 and a light sensor into sensor port 1, adjust your sensor block and sensor threshold (see step 5), and then copy this Snap! program. Watch the third video below to check your sensor code.
- If you have done steps 1-6 and the sensor is still not responding, you may be dealing with a broken sensor or a broken sensor port on your Hummingbird Bit. Try the sensor on another port (be sure to update your code to reflect the new port number).

-
- If the sensor reacts, the issue is with the Hummingbird sensor port.
- If the sensor does not react, switch it out with a different sensor. If the new sensor reacts, your first sensor was broken. Watch the fourth video below to see reasons why the servo motor may be broken.
- If needed, new components can be ordered from our store.
Watch this video to check your sensor connection:
Watch this video to see what number your sensor is generating:
Watch this video to double check your sensor code:
Watch this video to see why your sensor may not be working properly:
Is the micro:bit screen flashing 3 letters OR is your device no longer showing up in the Bluebird Connector?
- If yes, follow this link to our Interactive Support App for bluetooth troubleshooting solutions. If that works, please test the components – follow this link, select Hummingbird, then select the component you want to test. Finally, try to program in Snap! again.
- If no, select the Hummingbird Bit component that you are trying to control:
It is important to save your work frequently in Snap!. Snap! does not save automatically. This will cover two different ways of saving your work. First, you can export your work and save it to your computer or a USB drive. If you have internet access, you can also save your work online using a Snap! cloud account.
Note: Programs written in Snap! using the BlueBird Connector for Mac/Windows cannot be run on a Chromebook, and vice versa. If you need to convert a saved program from one platform to another, you can use this online converter.
Exporting a Snap! Program
You can save your work by exporting your Snap! File and saving it to your computer, cloud storage, or a USB drive.
Go to File and then Export project.
Depending on your browser settings, the program will either be downloaded directly to your Downloads folder, or you will be asked where you want to save it. If the program is downloaded automatically, it is named FinchSingleDeviceStarterProject.xml. You can find this file in your downloads folder and rename it or move it as needed. You should leave the .xml extension in the file name.
Important Note: You must export a new version of your file every time you want to save it!
Loading a File
To load a project that you previously exported, go to File and then Import. Select the name of your project. Then navigate to your exported file to open it.
Saving to a Snap! Cloud Account
If you have internet access, you can save your work in Snap! by using a cloud account. Ciick the Cloud button and then Log in to sign in to your account. You may need to set up an account if you do not already have one.
Once you are logged in, choose Save As on the File menu.
Give your program a descriptive name and make sure to select the Cloud option. Then click Save.
Important Note: Make sure to save your work frequently by going to File and then Save!
Loading from a Snap! Cloud Account
To open a file you saved previously, first log in to your Snap! cloud account. Then go to File and then Open.
Select your file in the window that pops up. Be sure to select the Cloud option.
This is a known bug in snap.birdbraintechnologies.com and we have two ways to work around this issue.
- You can disconnect your Hummingbird Bit, refresh the webpage, and reconnect your Hummingbird Bit to get the blocks to return.
- You can import our blank Hummingbird Bit program to reload your Hummingbird Bit blocks. You can find this XML file below.
Technical Specifications
The LED ports are current-limited via resistors. When an LED is installed, the current output is never more than 20 mA for single color LEDs, or 30 mA (Bit)/60 mA (Duo) for tri-color LEDs (if all three LED elements are on).
The HS311, FS5103B, and FS5103R servos draw 150-200 mA under light operation. They can draw up to 800mA each if stalled.
The FS90 servo in the Hummingbird Bit base kit draws 100mA under light operation and up to 700mA if stalled.
Hummingbird Bit sensors run at 3.3V. All sensors packaged with Hummingbird Bit are 5V tolerant, so they are all backwards compatible with Hummingbird Duo controllers.
The Hummingbird Duo distance and sound sensors do not operate at 3.3V, so they do not work with Hummingbird Bit. Hummingbird Duo light, temperature, and dial sensors are compatible with the Hummingbird Bit.
The Hummingbird Bit uses the following pins on the micro:bit:
PIN 0: Used to control the buzzer on the Hummingbird Bit
PIN 1: Exposed on the Extensions Port
PIN 2: Directly controls single color LED port 2
PIN 8: Directly controls single color LED port 3
PIN 13: SCK signal for SPI communications to the Hummingbird’s daughter microcontroller
PIN 14: MISO signal for SPI communications to the Hummingbird’s daughter microcontroller
PIN 15: MOSI signal for SPI communications to the Hummingbird’s daughter microcontroller
PIN 16: SS signal for SPI communications to the Hummingbird’s daughter microcontroller
PIN 19: Exposed on the Extensions Port
PIN 20: Exposed on the Extensions Port
Pins 3-7 and 9-12 on the micro:bit edge connector are not used by the Hummingbird Bit.
Older Models FAQs
Finch Robot 1
The Finch 1’s tether makes repeatable movements difficult – turns cause the tether to twist, causing a spring force that tends to resist continued turning in the same direction. The tether may also drag on the Finch, causing it to turn slightly when it should move straight. You can minimize the effect of the tether by:
- Driving the Finch 1 on smooth flooring – carpeting will tend to slow down the Finch 1.
- Turning the Finch 1 at slow speeds.
- Using sensors to help the Finch 1 move more accurately, by using cues in its environment. For example, the Finch 1 can follow a light source or a wall.
- Holding the tether overhead while the Finch 1 is moving, as in the photo below (pair programming means 1 student can “walk the Finch” while the other uses the computer 🙂

Some variation in motor speed is common, even for industrial grade motors. You may have to “tune” your Finch 1 to get it to move straight. For example, setting one wheel to 100 and the other to 95 may get the Finch 1 to move straight.
USB plugs and cables can weaken over time and this can affect the stability of the Finch 1’s connection to the computer.
Stable as they seem, the USB cable is the most common cause for Finch 1 connection failure. Try another USB cable and see if that fixes the problem.
USB ports (particularly on older Chromebooks) have been know to either fail, or the ports are not made to output the 5v required to power the Finch 1. Usually, at least 1 port on a computer will output the proper amount of power, so try other USB ports if you are having connection issues.
Often as the Finch 1s age the connection between the cable and the USB becomes loose. Try using a cable tie or tape to fasten the USB cable to the Finch 1, providing strain relief, so that there is little movement of the cable near the plug.

The Finch 1 uses two infrared LEDs and an infrared receiver to detect obstacles. Using infrared is a low-cost and effective way to detect most obstacles, but it is limited. We strongly recommend using lightly colored obstacles like cardboard boxes or white office paper. Covering obstacles in tin foil increases responsiveness significantly.
Additionally:
- The obstacle must be approximately 2”-4” from the sensor to be detected.
- Dark and non-reflective objects are harder to detect.
- Narrow vertical objects like chair legs may not be detected.
- Certain black plastics transmit infrared light (they look like glass in the IR spectrum) and don’t reflect sufficiently to be detected.
If you have a successful connection to your Finch 1 the LED in the Finch 1’s nose will blink in rainbow colors for a few seconds. If the LED didn’t turn rainbow colors, your USB connection is not working.
You might have a bad connection through your USB cord. To test your USB connection:
- Disconnect the USB cord from the Finch 1, your computer, and any adapters. Count to 10. Securely reconnect the USB to your Finch 1 and computer. If that doesn’t help then:
- Try a different USB port on your computer. If that doesn’t help then:
- Try using a different USB cord. If this works, you had a bad USB cord. If this is the case, let us know and we may be able to replace your USB cord if it is still covered under warranty!
Note: A flashing beak does NOT mean you are successfully connected through software, merely that the Finch 1 has power, and that the USB connection is good. The software itself should tell you when it has established a connection with the Finch 1.
If your Finch 1 was working but then seemed to disconnect
- Save your work and close the programming software you’re using.
- Disconnect the Finch 1 from USB.
- Reopen the programming software.
- Re-run your program. If it works, then the issue was probably a software glitch.
3. Are the computers being using Windows? We only support 32-bit Python for Windows, but you can use the library on 64-bit versions of Windows so long as you install a 32-bit version of Python.
If none of these are the issue, please contact us at support@birdbraintechnologies.
The Finch 1 works with Snap!, Python, and Java. These programming languages range from easy drag-and-drop languages appropriate for kindergarteners to industry-standard, text-based programming environments.
On our portal select the device and software language you will use and you will be taken to an installation guide, step-by-step lessons, and project ideas for each programming language.
We provide support for the Finch 1 in Snap!, Scratch, Python, and Java. We offer legacy libraries for a few other languages, including Scratch, C++, C, Javascript, Processing, and Visual Basic.
General Questions
It is important to save your work frequently in Snap!. Snap! does not save automatically. This will cover two different ways of saving your work. First, you can export your work and save it to your computer or a USB drive. If you have internet access, you can also save your work online using a Snap! cloud account.
Note: Programs written in Snap! using the BlueBird Connector for Mac/Windows cannot be run on a Chromebook, and vice versa. If you need to convert a saved program from one platform to another, you can use this online converter.
Exporting a Snap! Program
You can save your work by exporting your Snap! File and saving it to your computer, cloud storage, or a USB drive.
Go to File and then Export project.
Depending on your browser settings, the program will either be downloaded directly to your Downloads folder, or you will be asked where you want to save it. If the program is downloaded automatically, it is named FinchSingleDeviceStarterProject.xml. You can find this file in your downloads folder and rename it or move it as needed. You should leave the .xml extension in the file name.
Important Note: You must export a new version of your file every time you want to save it!
Loading a File
To load a project that you previously exported, go to File and then Import. Select the name of your project. Then navigate to your exported file to open it.
Saving to a Snap! Cloud Account
If you have internet access, you can save your work in Snap! by using a cloud account. Ciick the Cloud button and then Log in to sign in to your account. You may need to set up an account if you do not already have one.
Once you are logged in, choose Save As on the File menu.
Give your program a descriptive name and make sure to select the Cloud option. Then click Save.
Important Note: Make sure to save your work frequently by going to File and then Save!
Loading from a Snap! Cloud Account
To open a file you saved previously, first log in to your Snap! cloud account. Then go to File and then Open.
Select your file in the window that pops up. Be sure to select the Cloud option.
These programming languages will work without any additional equipment:
Original Hummingbird – Snap!, Python, and Java
Hummingbird Duo – Snap!, Python, Java, and Arduino
You can also upgrade your Hummingbird Duo Kits to use them with tablets or with micro:bits:
- Purchase the Hummingbird Duo BirdBlox Upgrade Bundle to program with BirdBlox via Bluetooth on tablets.
- Purchase the Hummingbird Duo MakeCode Upgrade Bundle to turn your Duo into a micro:bit Bit Kit and program it with MakeCode.
If you have additional questions or would like to discuss your options, please contact support@birdbraintechnologies.com.
As of June 30, 2020 we no longer support the CREATE Lab Visual Programmer.
Visual Programmer was the first software to use the original Hummingbird Kit in 2009, but as operating systems continue to evolve, it is showing its age. Notably, the Visual Programmer no longer functions on Mac OS Catalina, and there is no clear technical path to resolving this issue.
We continue to support several other programming options for the original Hummingbird and the Hummingbird Duo. To explore other options to use in place of Visual Programmer visit What should I use instead of CREATE Lab Visual Programmer?
You can also explore all of our coding choices through our Learning Portal.
MakeCode automatically saves programs on the device that you are using. However, these programs may be deleted if your browser history is deleted. This will describe ways to save a program more permanently or share it with another person.
Downloading a File
Instead of downloading a program’s .hex file to the Finch, you can download it to your computer or Chromebook. After clicking Download, select the location where you want to save the .hex file and click Save. You can then email the file, store it on a USB drive, or treat it as you would any other file.
Loading a File
To load a file that you have saved in a .hex file, click on the Home button in MakeCode. From the home screen, click on the Import button.
Click on Import File.
Click on Choose File and navigate to the file you saved. Select it and then click Go ahead! Your file will open in MakeCode.
Sharing a File
To share a file, click on the Share button in MakeCode
Click Publish Project.
MakeCode will show you a link that you can share with others. Alternatively, you can also click Embed to see code to embed your project in a website.
Hummingbird Duo
The screws you need are 1/4″ 18-8 Stainless Steel Sheet Metal Screws with a Pan Head Type. We do not sell replacement screws, but you can follow this link to purchase more screws for your gear motors.
Hummingbird’s four servo ports are designed for compatibility with 6V RC analog servos. The servo signals pulse every 20ms and have a programmable up-time between 0.6 and 2.4ms. The servos share the battery power supply, and the total current draw combined for all servos, LEDs, and sensors, should not exceed 2000 mA.
Yes, it is easy to upgrade your Hummingbird Duos!
To upgrade your Hummingbird Duos to work on tablets, purchase the BirdBlox bundle.
To upgrade your Hummingbird Duos to work wirelessly, purchase the MakeCode bundle.
Here is a chart which explains which parts of the Hummingbird Robotics Kits are compatible with the other version.
If you already have a flock of Hummingbird Duos, we suggest that you continue to use Hummingbird Duo, as components, programming, and device compatibility varies between the different Hummingbird Kits.
To upgrade your Duos to work with tablets and smartphones, purchase our BirdBlox Upgrade Bundle.
To upgrade your Duos to work with micro:bits, purchase our MakeCode Upgrade Bundle.
More information about MakeCode and Duos is found here.
The Hummingbird Bit is the third generation of the Hummingbird Robotics Kit. The Bit can do more than the Hummingbird Duo at a lower price point.
- The Bit can be programmed using any computer, tablet, or smartphone.
- Any project or activity done with Hummingbird Duo can be replicated with Hummingbird Bit.
- The Bit adds new hardware features: 2 buttons, an accelerometer, a compass, and a 5×5 LED grid.
- Hummingbird Bits can communicate with one another and with stand-alone micro:bits.
- Bit Kits come in sturdy and reusable plastic tackle boxes.
- Bit Software is being translated, for easier use in non-English speaking countries.
- The Bit does not work with Scratch or Arduino.
Check out this video of how to attach servo horns and wheels!
The small black screws that comes with the servo can be used to secure a servo horn to the servo spline (the white gear shaped shaft). This is helpful if you make a project where there is a lot of strain on the servo horn, potentially causing the horn to pop off. To secure the horn with the screw, place the horn on the servo spline, then put the black screw in the central hole of the servo horn and screw it in using a Philips screwdriver.
The silver screws in the servo accessories bag can be threaded into the small holes in the servo horns to attach linkages or other materials to the servo horns.
The copper colored rings can be used to mount the servo to wood.
The screws you need are 2.6mm Thread-Forming Screw (8mm Length).
We do not sell replacement screws, but you can follow this link to purchase more screws for your servos.
We do not sell replacement servo horns, but you can purchase more at the links below.
For Hummingbird Bit Servos (Feetech FS5103B and FS5103R), please visit this webpage.
For Hummingbird Duo Servos (Hitec HS-311), please visit this webpage.
We provide support for the Hummingbird Duo in BirdBlox, MakeCode, Snap!, Ardublock/Arduino, Python, and Java. We offer legacy libraries for a few other languages.
In order to use your Hummingbird Duo with MakeCode you will first need to purchase the Hummingbird Duo MakeCode Upgrade bundle.
Click here for more information about switching the firmware on your Hummingbird Duo.
Hummingbird Duo sensors run at 5V.
Hummingbird Bit sensors run at 3.3V. All sensors packaged with Hummingbird Bit are 5V tolerant, so they are all backwards compatible with Hummingbird Duo controllers.
The Hummingbird Duo distance and sound sensors do not operate at 3.3V, so they do not work with Hummingbird Bit. Hummingbird Duo light, temperature, and dial sensors are compatible with the Hummingbird Bit.
The HS311, FS5103B, and FS5103R servos draw 150-200 mA under light operation. They can draw up to 800mA each if stalled.
The FS90 servo in the Hummingbird Bit base kit draws 100mA under light operation and up to 700mA if stalled.
The LED ports are current-limited via resistors. When an LED is installed, the current output is never more than 20 mA for single color LEDs, or 30 mA (Bit)/60 mA (Duo) for tri-color LEDs (if all three LED elements are on).
We recommend a 4 AA battery pack, our rechargeable power bank, or a 5V, 2A power adapter.
Any power supply for Hummingbird should have a voltage between 4.5V and 7V and a current rating of at least 1 amp (2 amps if you intend to run 3 or more servos). The maximum voltage you should use with your Hummingbird is 7V.
Tech Support
Technical Specifications
Purchasing & Accounting FAQs
Purchasing
You only have to pay sales tax if you are shipping to Florida, Tennessee, North Carolina, Wisconsin, Pennsylvania, Massachusetts, or Virginia and are not making the purchase for a tax-exempt entity.
Non-profit organizations and tax-exempt schools in these states should email their sales tax exemption forms to sales@birdbraintechnologies.com and then we will be able to place an order for you without sales tax.
A copy of our most recent W9 can be found below.
Please email sales@birdbraintechnologies.com with questions.
Yes, we accept purchase orders from educational institutions in the United States.
If you would like to pay with a purchase order, please enter the PO number during your store checkout, and then email a copy of the PO to sales@birdbraintechnologies.com or fax a copy of the PO to 412-283-9134.
We will not ship your order until we have received a copy of the PO. If you submit your order online and we don’t receive a copy of the PO within 7 days, your order will be canceled.
If you would like a price quote, please complete our Request a Quote form. Be sure to include a list of the items and quantities you would like to have included on the quote.
For general questions, please email sales@birdbraintechnologies.com.
If you are not completely satisfied with your purchase, simply return the item to us in its original condition within 30 days of receipt. Please email support@birdbraintechnologies.com before sending us a returned item!
Product Exchanges:
Once you receive your replacement product, you must return the original product within 30 days. If you do not meet this deadline, your account will be charged for the replacement product.
Returns:
Shipping costs are non-refundable, and all returns incur a 25% restocking fee unless the return is due to a BirdBrain shipping error, order error, or product warranty issue.
You can order direct from our online store or from one of our partners:
Australia and New Zealand
Education Technology Specialists
Belgium
Canada
Fair Chance Learning
Merconnet
Robotix Education Inc
RobotShop CA
Denmark
Finland
Mexico
Editorial Caze
Norway
Netherlands
Spain
Make + Learn
Sweden
United States
bluum
Carolina Biological
CodeJoy
Fluxspace
Geyer Instructional Products
Learning Labs, Inc.
Mackin
Maker Maven
Midwest Technology Products
School Specialty
STEMfinity
Teq
Please click here to download a PDF of our warranty.
Shipping
Yes, BirdBrain ships to many international destinations via UPS. Customers pay the shipping costs and payment terms are ‘in advance’ (credit card or bank transfer). We do not accept purchase orders or payment after shipping.
We do not ship to the following countries: Afghanistan, Belarus, Cuba, Iran, North Korea, Libyan Arab Jamahiriya, Palestinian Territory, Russia, Saudi Arabia, Somalia, South Sudan, Syria, Venezuela, Yemen, and Zimbabwe.
Please note that many countries charge import taxes and duties on shipments of electronics products. You will likely be assessed such duties at the time of import and you are responsible for payment of them. Due to the large number of laws and enforcement methods, we unfortunately cannot provide an estimate of duties that may be applied to your shipment. For this reason, we recommend that customers outside of the USA purchase through an authorized reseller (see list below). Our international resellers will offer a more seamless purchasing experience.
BirdBrain’s international partners and authorized resellers:
Australia and New Zealand
Education Technology Specialists
Belgium
Canada
Denmark
Finland
Lekolar
Mexico
Editorial Caze
Norway
Netherlands
Spain (Catalonia)
Sweden
Curious about using our teaching tools in your classroom?
Contact us to learn more.